


私は、TikZ を使用してフレーズまたは文のピッチ パターン (イントネーション) を表すことを検討しています。
添付の MWE のように、すでにいくつかの有用な結果が得られています (ただし、1.1 ではベースラインがレベルアップしていないようです)。
%!TEX TS-program = xelatex
%!TEX encoding = UTF-8 Unicode
\documentclass[a4paper,12pt, oneside]{article}
\usepackage{fontspec}
\defaultfontfeatures{Mapping=tex-text, Scale=MatchLowercase}
\setmainfont{Charis SIL}
\usepackage{tikz}
\begin{document}
\section{Marking intonation using TikZ}
\subsection{Setting words on different levels}
\begin{table}[hbtp]
\begin{tabular}{ll}
\cline{1-1} \noalign{\smallskip}
\tikz[x=1mm,y=1mm,baseline=12] \draw (0,10) node {\underline{Where}} (10,2) node {are} (20,2) node {you} (30,6) node {\underline{go}} (40,0) node{ing?}; & \textit{neutral/default - stress represented by underlining}\\
\cline{1-1} \noalign{\smallskip}
\tikz[x=1mm,y=1mm,baseline=12] \draw (0,0) node {Where} (10,10) node {\underline{are}} (20,5) node {you} (30,2) node {go} (40,0) node{ing?}; & \textit{ e.g. in response to ``I'm not going to the shops after all.''}\\
\cline{1-1}
\end{tabular}
\end{table}
Why do ``are'' and ``you'' in the first example appear on slightly
different levels, even though they are both set to 1mm on the y axis?
Likewise for ``where'' and ``ing'' in the second example.
I'm not sure I'm using ``baseline'' properly here!
\subsection{As above, but boxed}
\begin{tikzpicture}
\node[draw] at (0,1) {\underline{Where}};
\node[draw] at (1,0.1) {are};
\node[draw] at (2,0.1) {you};
\node[draw] at (3,0.6) {\underline{go}};
\node[draw] at (4,0) {ing?};
\end{tikzpicture}\
Still have to figure out the difference between ``\textbackslash draw node'' and ``\textbackslash node[draw]''!
\subsection{Graphical contour}
\begin{table}[hbtp]
\begin{tabular}{l}
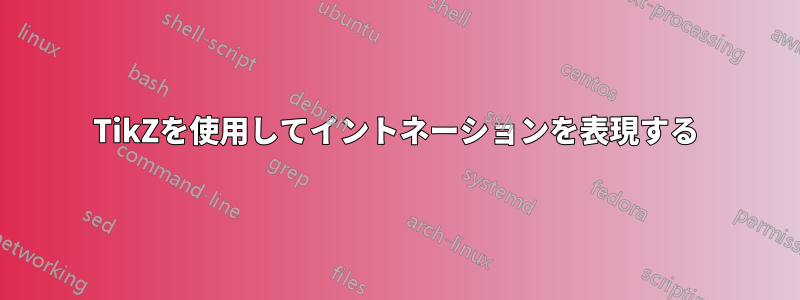
\tikz[x=1mm,y=1mm,rounded corners=2mm] \draw[very thick, gray](0,10)--(10,2)--(20,2){[red]--(30,6)--(40,0)}; \\
Where are you~~~going?
\end{tabular}
\end{table}
\begin{table}[hbtp]
\begin{tabular}{l}
\tikz[x=1mm,y=1mm,rounded corners=2mm] \draw[very thick, gray](0,10)--(12,2)--(23,2){[red]--(26,6)--(35,0)}; \\
Where are you going?
\end{tabular}
\end{table}
This is preferable to setting the individual words on different levels, but
requires trial and error in (i) matching the length of the whole contour to
the utterance, and (ii) spreading the parts of the contour to match the words
of the utterance, either by spacing the words (first example) or adjusting the
contour points (second example).
\end{document}
しかし、私の主な質問は、1.3 の問題に対処する方法を持っている人がいるかどうかです。これには、単語に輪郭を合わせる試行錯誤が伴い、特定の輪郭座標を特定の音節に何らかの方法で固定する方法があるかどうか疑問に思っていました。線をノードに接続できることは知っていますが、線をノードの上に「浮かせる」方法を見つけることができませんでした。入力時にテキストの行にアンカー ポイントを付け、その間に輪郭を描くことができるようにするための提案はありますか?

答え1
Matthew Leingang の回答に続いて、同じアプローチをいくつかの構文糖と組み合わせて示します。これは\catcode物事を混乱させるので、注意が必要です。
\documentclass{standalone}
\usepackage{tikz}

\newcount\contourmarkcount
\newdimen\contourraise

{\catcode`\|=13
\gdef\installbarmark#1\ignorespaces{%
    #1\ignorespaces%
    \catcode`\|=13%
    \global\contourmarkcount=0\relax%
    \global\def\lastmarkshift{0}%
    \let|=\marktext}%
}


\def\star{*}
\newcommand\marktext[1][*]{%
    \def\markshift{#1}%
    % When not followed by the optional argument
    % the contour mark is set at the previous height.
    \ifx\markshift\star
        \let\markshift=\lastmarkshift%
    \fi
    \global\advance\contourmarkcount by1\relax%
    \xdef\tmpmark{\the\contourmarkcount}%
    \tikz[remember picture, overlay, y=\pgfkeysvalueof{/tikz/contour scale}]
        \path [yshift=\contourraise, shift={(0,\markshift)}]
                coordinate (\contourmarkprefix-\tmpmark);%
    \global\contourmarkcount=\tmpmark\relax%
    \global\let\lastmarkshift=\markshift%
}


\tikzset{
    intonation contour/.style={%
        execute at begin node={%
            \installbarmark%
        },
        append after command={%
            \pgfextra{%
                \ifnum\contourmarkcount>1
                    \draw [contour] (\contourmarkprefix-1)
                        \foreach \y in {2,...,\the\contourmarkcount}{ -- (\contourmarkprefix-\y) };
                \fi
            }
        }
    },
    % How far above the base line of the text,
    raise contour/.code=\pgfmathsetlength\contourraise{#1},
    % The `scale' for the values in the contour height specification
    contour scale/.initial=3pt,
    % The prefix for the contour marks.
    contour mark prefix/.code=\xdef\contourmarkprefix{#1},
    contour mark prefix=intonation contour,
    contour/.style={
        draw,
        rounded corners=1ex,
    }
}

\begin{document}

\begin{tikzpicture}[remember picture]

\node [intonation contour, raise contour=0.5cm]
    {|[10]Where |[3]are |[3]you |[5]go|[2]ing|[0]?};

\end{tikzpicture}

\begin{tikzpicture}[remember picture]

\node [intonation contour, raise contour=0.5cm, contour mark prefix=my contour]
    {|[2]I  |am  |[7]fina|lly |[4]go|ing |[2]home|[0].};

\path [draw=red, ->] ([yshift=0.25cm]my contour-2) -- ([yshift=0.25cm]my contour-3)
        node [midway, left] {\tiny rising};

\path [draw=red, ->] ([yshift=0.25cm]my contour-4) -- ([yshift=0.25cm]my contour-5)
    node [midway, right] {\tiny falling};
\end{tikzpicture}

\end{document}

楽しみのために、 を使用しないバージョンを用意しましたremember picture。そのため、2 つのコンパイルは必要ありません。また、カテゴリ コードをいじる必要もありません。残念ながら、少し複雑で、文字がすべて別々のボックスにあるため、理想的なタイプセットではありません。
編集より汎用性が高まりましたが、その結果、少し複雑になりました。
\documentclass{standalone}
\usepackage{tikz}

\newdimen\contourraise

\tikzset{
    % How far above the base line of the text,
    raise contour/.code=\pgfmathsetlength\contourraise{#1},
    % The `scale' for the values in the contour height specification
    contour scale/.initial=3pt,
    % The prefix for the contour marks.
    contour mark prefix/.code=\xdef\contourmarkprefix{#1},
    contour mark prefix=contour,
    % The style for the contour path
    contour/.style={
        draw,
        rounded corners=1ex,
    },
    % The style for the token nodes
    contour token/.style={
        anchor=base west,
        inner sep=0pt,
        text depth=0.6ex, % controls underline depth
    },
    contour underline/.style={
        draw
    },
    % The character to insert a mark (use with care)
    contour mark character/.store in=\contourmarkchar,
    contour mark character=|
}


\makeatletter

\def\at@{@}

\newcount\lasttokennumber
\newcount\currenttokennumber
\newcount\contourmarkcount
\newcount\contourtokenunderlinestate
\newcommand\contour[2][]{%
    \begin{scope}[#1]
        \coordinate (token-0);
        \currenttokennumber=0\relax%
        \lasttokennumber=0\relax%
        \contourmarkcount=0\relax%
        \def\lastcontourheight{0}%
        \contourtokenunderlinestate=0\relax%
        \@contour#2@%
}


% Must check for a spaces
\def\@contour{\futurelet\@token\@checkforspace}

\def\@uscore{_}
\def\@checkforspace{%
    \ifx\@token\@sptoken%
        \let\@next=\@replacespace%
    \else%
        \if\@token\contourmarkchar%
            \let\@next=\@contour@insertmark
        \else%
            \if\@token\@uscore
                \let\@next=\@contourtoggleunderline%
            \else%
                \let\@next=\@@contour%
            \fi%
        \fi%
    \fi%
    \@next%
}

\def\@contourtoggleunderline#1{%
    \advance\contourtokenunderlinestate by1\relax
    \ifnum\contourtokenunderlinestate>3\relax%
        \contourtokenunderlinestate=0\relax%
    \fi%
    \@contour%
}

\def\@contour@insertmark{%
    \afterassignment\@@contour@insertmark\let\@token=%
}

\def\@@contour@insertmark{%
    \futurelet\@token\@@@contour@insertmark}%

\def\@@@contour@insertmark{%
    \if\@token[%
        \let\@next=\@@@@contour@insertmark%
    \else%
        \let\currentcontourheight=\lastcontourheight%
        \let\@next=\@@@@@contour@insertmark%
    \fi%
    \@next%
}

\def\@@@@contour@insertmark[#1]{%
    \def\@tmp{#1}%
    \ifx\@tmp\@empty%
        \let\currentcontourheight=\lastcontourheight%
    \else%
        \def\currentcontourheight{#1}%
    \fi%
    \@@@@@contour@insertmark}

\def\@@@@@contour@insertmark{%
    \advance\contourmarkcount by1\relax%
    % Code for inserting mark
    \coordinate (\contourmarkprefix-\the\contourmarkcount)
        at ([yshift=\contourraise, y=\pgfkeysvalueof{/tikz/contour scale},
        shift={(0,\currentcontourheight)}]token-\the\currenttokennumber.base east);
    %
    \let\lastcontourheight=\currentcontourheight
\@contour}

\def\customspace{{\hbox to 1ex{\hfill}}}

\def\@replacespace#1{%
    \@contour\customspace#1%
}

\def\@@contour#1{%
    \def\@token{#1}%
    \if\@token\at@
        \let\@next=\@@@contour%
    \else%
        \lasttokennumber=\currenttokennumber%
        \advance\currenttokennumber by1%
        % Code for typesetting token
        \node [contour token/.try] at (token-\the\lasttokennumber.base east) (token-\the\currenttokennumber) {\@token};
        % Manage underline state
        \ifnum\contourtokenunderlinestate=1\relax%
            \coordinate (underline start) at (token-\the\currenttokennumber.south west);
            \contourtokenunderlinestate=2\relax%
        \else
            \ifnum\contourtokenunderlinestate=3\relax%
                \coordinate (underline end) at (token-\the\currenttokennumber.south west);
                \draw (underline start) -- (underline end);
                \contourtokenunderlinestate=0\relax
            \fi%
        \fi%
        \let\@next=\@contour
        %
    \fi%
    \@next%
}
\def\@@@contour{%
    \ifnum\contourmarkcount>1
        % Code for drawing contour
        \draw [contour] (\contourmarkprefix-1)
            \foreach \y in {2,...,\the\contourmarkcount}{ -- (\contourmarkprefix-\y) };
        %
    \fi%
    \end{scope}%
}

\makeatother

\begin{document}

\begin{tikzpicture}[baseline={(0,-0.25)}]

    \contour[raise contour=0.5cm]
        {|[10]Where |[3]are |[3]_you_ |[5]go|[2]ing|[0]?}

\end{tikzpicture}


\begin{tikzpicture}[baseline={(0,-0.25)}]

\contour[
    raise contour=0.5cm,
    contour mark prefix=my contour,
    contour/.style={
        thick,
        rounded corners=1mm,
        line cap=round,
        dotted},
    contour mark character=*]
    {*[2]I *am  *[7]_{fi}na*lly_ *[4]go*ing *[2]home*[0].};

\path [draw=red, ->] ([yshift=0.25cm]my contour-2) -- ([yshift=0.25cm]my contour-3)
        node [midway, left] {\tiny rising};

\path [draw=red, ->] ([yshift=0.25cm]my contour-4) -- ([yshift=0.25cm]my contour-5)
    node [midway, right] {\tiny falling};

\path (0,-0.25);
\end{tikzpicture}

\end{document}

編集:上記のすべてのユースケースをカバーする拡張バージョンです。
\documentclass{standalone}
\usepackage{tikz}
\usetikzlibrary{fit}

\newdimen\contourraise
\newdimen\contourspacetokenwidth
\newcount\lasttokennumber
\newcount\currenttokennumber
\newcount\contourmarkcount
\newcount\contourtokenunderlinestate
\newbox\contourbox

\tikzset{
    tight fit/.style={
        inner sep=0pt,
        outer sep=0pt,
    },
    %
    %
    % How far above the reference anchor of the text,
    contour raise/.code=\pgfmathsetlength\contourraise{#1},
    contour reference anchor/.store in=\contourreferenceanchor,
    contour reference anchor=base east,
    % The `scale' for the values in the contour height specification
    contour scale/.store in=\contourscale,
    contour scale=3pt,
    % The prefix for the contour marks.
    contour mark prefix/.store in=\contourmarkprefix,
    contour mark prefix=contour,
    % The style for the contour path
    contour/.style={
        draw,
        rounded corners=1ex,
    },
    % The style for the token nodes
    every contour token/.style={
        anchor=base west,
        inner sep=0pt,
    },
    contour underline/.style={
        draw
    },
    % The character to insert a mark (use with care)
    contour mark character/.store in=\contourmarkchar,
    contour mark character=|,
    % Want to change the code for contour marks? Use this key.
    contour mark code/.store in=\contourmarkcode,
    % Want to change the code for tokens? Use this key.
    contour token code/.store in=\contourtokencode,
    % Want to change the code for drawing the contour? Use this  key.
    contour code/.store in=\contourcode,
    %
    % Default stuff
    contour mark code={%
        \coordinate (\contourmarkprefix-\the\contourmarkcount)
          at ([yshift=\contourraise, y=\contourscale,
          shift={(0,\currentcontourheight)}]token-\the\currenttokennumber.\contourreferenceanchor);
    },
    contour token code={%
        \node [every contour token/.try] at
        (token-\the\lasttokennumber.base east)
            (token-\the\currenttokennumber) {\token};
    },
    contour code={
        \draw [contour] (\contourmarkprefix-1)
            \foreach \y in {2,...,\the\contourmarkcount}{ --
                    (\contourmarkprefix-\y) };
    },
    %
    % Don't draw the contour.
    tokens only/.style={
        contour code={}
    },
    %
    % Only draw the contour (but the space is still used for the tokens)
    contour only/.style={
        every contour token/.append style={
            execute at begin node={\setbox\contourbox=\hbox\bgroup},
            execute at end node=\egroup\phantom{\box\contourbox}%
        },
        underline/.style={
            draw=none
        }
    },
    %
    % Make tokens follow the contour marks.
    tokens follow contour/.style={
        tokens only,
        contour token code={%
            \node [every contour token/.try, y=\contourscale] at
                (token-\the\lasttokennumber.base east |-
                0,\currentcontourheight)
                (token-\the\currenttokennumber) {\token};
        },
    },
    % What style to use when drawing underline
    underline/.style={
        draw
    },
    % The underline is drawn along the south side of a node which
    % takes this style.
    underline token/.style={
        inner ysep=1pt
    },
    % When grouping tokens (e.g., for putting box around)
    % this style is applied to a node that is fitted around the group
    token group/.style={
        inner xsep=1pt,
        inner ysep=2pt,
        rounded corners=2pt
    },
    % Draw boxes around tokens groups.
    box tokens/.style={
        token group/.append style={
            draw
        }
    },
    % Change the width of the spaces.
    space token width/.code=\pgfmathsetlength\contourspacetokenwidth{#1},
    space token width=0.125cm
}


\makeatletter

\def\at@{@}


\newcommand\contour[2][]{%
    \begin{scope}[#1]
        \coordinate (token-0);
        \currenttokennumber=0\relax%
        \lasttokennumber=0\relax%
        \contourmarkcount=0\relax%
        \def\lastcontourheight{0}%
        \contourtokenunderlinestate=0\relax%
        \@contour#2@%
}


% Must check for a spaces
\def\@contour{\futurelet\@token\@checkforspace}

\def\@uscore{_}
\def\@checkforspace{%
    \ifx\@token\@sptoken%
        \let\@next=\@replacespace%
    \else%
        \if\@token\contourmarkchar%
            \let\@next=\@contour@insertmark
        \else%
            \if\@token\@uscore
                \let\@next=\@contourtoggleunderline%
            \else%
                \let\@next=\@@contour%
            \fi%
        \fi%
    \fi%
    \@next%
}

\def\@contourtoggleunderline#1{%
    \advance\contourtokenunderlinestate by1\relax
    \ifnum\contourtokenunderlinestate>3\relax%
        \contourtokenunderlinestate=0\relax%
    \fi%
    \@contour%
}

\def\@contour@insertmark{%
    \afterassignment\@@contour@insertmark\let\@token=%
}

\def\@@contour@insertmark{%
    \futurelet\@token\@@@contour@insertmark}%

\def\@@@contour@insertmark{%
    \if\@token[%
        \let\@next=\@@@@contour@insertmark%
    \else%
        \let\currentcontourheight=\lastcontourheight%
        \let\@next=\@@@@@contour@insertmark%
    \fi%
    \@next%
}

\def\@@@@contour@insertmark[#1]{%
    \def\@tmp{#1}%
    \ifx\@tmp\@empty%
        \let\currentcontourheight=\lastcontourheight%
    \else%
        \def\currentcontourheight{#1}%
    \fi%
    \@@@@@contour@insertmark}

\def\@@@@@contour@insertmark{%
    \advance\contourmarkcount by1\relax%
     % Code for inserting mark
    \contourmarkcode%
    \let\lastcontourheight=\currentcontourheight%
    \@contour}

\def\contourspacetoken{{\hbox to \contourspacetokenwidth{\hfill}}}

\def\@replacespace#1{%
    \@contour\contourspacetoken#1%
}

\def\@@contour#1{%
    \def\@token{#1}%
    \if\@token\at@%
        \@contourdounderline%
        \pgfutil@ifundefined{pgf@sh@ns@tokengroup}{}{%
            \node [tight fit, fit={(tokengroup)}, token group/.try] {};
            \global\let\pgf@sh@ns@tokengroup=\relax%
        }%
        \let\@next=\@@@contour%
    \else%
        \lasttokennumber=\currenttokennumber%
        \advance\currenttokennumber by1%
        \let\token=\@token%
        % Code for typesetting token
        \contourtokencode%
        % Manage underline state
        \@contourdounderline%
        \def\@@token{\contourspacetoken}%
        \ifx\@token\@@token%
            \pgfutil@ifundefined{pgf@sh@ns@tokengroup}{}{%
                \pgfutil@ifundefined{pgf@sh@ns@underline}{}{%
                    \node [tight fit, fit={(tokengroup) (underline)}]
                    (tokengroup)
                {};}%
                \node [tight fit, fit={(tokengroup)}, token group/.try] {};
                \global\let\pgf@sh@ns@tokengroup=\relax%
            }%
        \else
            \pgfutil@ifundefined{pgf@sh@ns@tokengroup}{%
                \node [tight fit,
                fit={(token-\the\currenttokennumber)}]
                (tokengroup) {};
            }{%
                \node [tight fit,
                fit={(token-\the\currenttokennumber)
                (tokengroup)}]
                (tokengroup){};
            }%
        \fi%
        \let\@next=\@contour
        %
    \fi%
    \@next%
}

\def\@contourdounderline{%
    \ifcase\contourtokenunderlinestate%
     \or
         \node [tight fit, fit={(token-\the\currenttokennumber)}]
         (underline) {};
         \contourtokenunderlinestate=2\relax%
     \or%
            \node [tight fit,fit={(token-\the\currenttokennumber) (underline)}]
            (underline) {};
     \or%
            \node [tight fit, fit={(underline)}, underline token/.try]
            (underline) {};
         \draw [underline/.try]
                    (underline.south west) -- (underline.south east);
            \pgfutil@ifundefined{pgf@sh@ns@tokengroup}{}{%
                 \node [tight fit, fit={(tokengroup) (underline)}]
                 (tokengroup) {};%
                 \node [tight fit, fit={(tokengroup)}, token group/.try] {};
                 \global\let\pgf@sh@ns@tokengroup=\relax%
                 \global\let\pgf@sh@ns@underline=\relax%
             }
         \contourtokenunderlinestate=0\relax
     \fi%
}
\def\@@@contour{%
    \ifnum\contourmarkcount>1
        % Code for drawing contour
        \contourcode%
    \fi%
    \end{scope}%
}

\makeatother

\begin{document}

\begin{tabular}{c}
\\
\begin{tikzpicture}
    \contour[tokens follow contour]
        {|[10]_Where_ |[3]are you |[6]_go_|[1]ing?|[0]}
\end{tikzpicture}

\\[0.5cm]

\begin{tikzpicture}
    \contour[tokens follow contour, box tokens, space token width=0.2cm]
       {|[10]_Where_ |[3]are you |[6]_go_ |[1]ing?|[0]}
\end{tikzpicture}

\\[0.5cm]

\begin{tikzpicture}
    \contour[contour raise=0.5cm]
        {|[10]_Where_ |[3]are you |[6]_go_|[1]ing?|[0]}
\end{tikzpicture}


\\[0.5cm]

\begin{tikzpicture}
    \contour[contour raise=0.5cm]
        {|[10]Where |[3]are |[3]_you_ |[5]go|[2]ing?|[0]}

    \contour[contour raise=0.5cm, contour only, contour/.append style={dashed}]
            {|[0]Where |[2]are |[8]you |[2]go|[2]ing?|[1]}

\end{tikzpicture}

\\[1cm]

\begin{tikzpicture}
\contour[tokens follow contour,
    contour mark character=*]
    {*[2]I *am  *[7]_{fi}na*lly_ *[4]go*ing *[2]_home_*[0]};
\end{tikzpicture}
\\[0.5cm]
\begin{tikzpicture}
\contour[
    contour raise=0.5cm,
    contour mark prefix=my contour,
    contour/.style={
        thick,
        rounded corners=1mm,
        line cap=round,
        dotted},
    contour mark character=*]
    {*[2]I *am  *[7]_{fi}na*lly_ *[4]go*ing *[2]home*[0].};

\path [draw=red, ->] ([yshift=0.25cm]my contour-2) -- ([yshift=0.25cm]my
contour-3)
        node [midway, left] {\tiny rising};

\path [draw=red, ->] ([yshift=0.25cm]my contour-4) -- ([yshift=0.25cm]my
contour-5)
    node [midway, right] {\tiny falling};

\end{tikzpicture}

\end{tabular}
\end{document}

答え2
私は有名な\tikzmarkマクロを作成し、交差点の座標と組み合わせます。コードは次のとおりです。
\documentclass{standalone}
\usepackage{tikz}
\newcommand{\tikzmark}[1]{\tikz[overlay,remember picture,baseline] \node [anchor=base] (#1) {};}%
\tikzstyle{intonation}=[rounded corners=2mm,yshift=1.5ex]
\begin{document}

\begin{tikzpicture}[remember picture]
\node{\tikzmark{w}Where \tikzmark{a}are \tikzmark{y}you \tikzmark{g}go\tikzmark{i}ing\tikzmark{q}?};
\draw[intonation] (w |- 0,1) -- (a |- 0,0.2) -- (y |- 0,0.2) -- (g |- 0,0.6) -- (q |- 0,0);
\end{tikzpicture}

\end{document}
マクロ\tikzmarkは、呼び出されたドキュメントのポイントの座標を保存します。そのため、ノード テキストは、文中のさまざまなポイントで、、などの座標\tikzmark{w}Where \tikzmark{a}are...を保存します。wa
AとがBTikZのノードまたは座標である場合、はを通る垂直線とを通る水平線(A |- B)の交点です。したがって、AB(w |- 0,1)バツのベースライン左点を座標するわでどこ、 そしてええ座標1。これを変更することができますええ他の座標名については、必要に応じて調整します。
結果は次のとおりです。

テキストを指定/マークし、定義するマクロを設計できるかもしれません。ええ同じ引数に複数の値を指定することはできませんが、これは可能な実装です。
答え3
座標を正しい場所に置いたか\zzbどうかはわかりませんが(2つのポイントで再利用しました)、

%!TEX TS-program = xelatex
%!TEX encoding = UTF-8 Unicode

\documentclass[a4paper,12pt, oneside]{article}

\usepackage{fontspec}
\defaultfontfeatures{Mapping=tex-text, Scale=MatchLowercase}
\setmainfont{Charis SIL}

\makeatletter
\def\savecoordinate#1#2{\sbox0{#2}\edef#1{\strip@pt\wd0}}
\makeatother

\usepackage{tikz}

\begin{document}


\savecoordinate\zza{Where }
\savecoordinate\zzb{Where are you}
\savecoordinate\zzc{Where are you going?}

\begin{table}[hbtp]
\begin{tabular}{l}
\tikz[x=1pt,y=1mm,rounded corners=2mm] \draw[very thick, gray](0,10)--(\zza,2)--(\zzb,2)--(\zzb,6)--(\zzc,0); \\
\mbox{Where are you going?}
\end{tabular}
\end{table}

\end{document}
答え4
1.1
問題は ではありませんbaseline。 tikzpicture 環境はボックス (tex のボックス) を定義します。 このボックスには、深さと高さがあります。 デフォルトでは、深さは null で、高さはボックスの高さです。 これは、左下の点がベースラインを定義するためです。 次のコードでは、baseline=(current bounding box.east) 表形式を使用したくないために と書きました。 tikz でオブジェクトを配置するのは非常に簡単だと思います。 テキストは\textit{neutral/default - stress represented by underlining}ボックスの中央に揃えられます。
注意:次のテキストに\mboxがあるため、テキストを配置する必要があります。\overful box
問題ははそしてあなたは で回避されますevery node/.style={anchor=base}。これはボックスと深さの問題です。文字の付いたボックスにはy大きな深さがあります。anchor=baseすべてのノードは同じベースラインを持ちます。
最後に:表形式と同じ結果を得るために、show background bottomなどを使用しました。
\begin{table}[hbtp]
\begin{tikzpicture}[baseline=(current bounding box.east),every node/.style={anchor=base},show background top,show background bottom]
\path (0,1) node {\underline{Where}} (1,.2) node {are} (2,.2) node {you} (3,.6) node {\underline{go}} (4,0) node{ing?};
\end{tikzpicture}%
\mbox{\textit{neutral/default - stress represented by underlining}}%

\begin{tikzpicture}[baseline=(current bounding box.east),every node/.style={anchor=base},show background bottom]
    \draw (0,0) node {Where} (1,1) node {\underline{are}} (2,.5) node {you} (3,.2) node {go} (4,0) node{ing?};
\end{tikzpicture}%
\mbox{\textit{e.g. in response to ``I'm not going to the shops after all.''}}%
\end{table}
1.2
パスにノードを追加すると、このノードはパスの一部ではありません。パスにアタッチされたオブジェクトですが、パスの一部のオプションはノードには使用されません。
\draw node ...,\path[draw] node ... ; パスを描くことを決定したが、drawパスのオプションがノードのオプションではないことを意味しますdraw。パスとノードを描画したい場合は、次のように記述する必要があります。\path[draw] node[draw] ... ;
1.3
完全なコードと結果
%!TEX TS-program = xelatex
%!TEX encoding = UTF-8 Unicode
\documentclass[a4paper,12pt, oneside]{article}

\usepackage{fontspec}
\defaultfontfeatures{Mapping=tex-text, Scale=MatchLowercase}
\setmainfont{Charis SIL}

\usepackage{tikz}
\usetikzlibrary{backgrounds}
\begin{document}

\section{Marking intonation using TikZ}

\subsection{Setting words on different levels}

\begin{table}[hbtp]
\begin{tikzpicture}[baseline=(current bounding box.east),every node/.style={anchor=base},show background top,show background bottom]
\path (0,1) node {\underline{Where}} (1,.2) node {are} (2,.2) node {you} (3,.6) node {\underline{go}} (4,0) node{ing?};
\end{tikzpicture}%
\mbox{\textit{neutral/default - stress represented by underlining}}%

\begin{tikzpicture}[baseline=(current bounding box.east),every node/.style={anchor=base},show background bottom]
    \draw (0,0) node {Where} (1,1) node {\underline{are}} (2,.5) node {you} (3,.2) node {go} (4,0) node{ing?};
\end{tikzpicture}%
\mbox{\textit{e.g. in response to ``I'm not going to the shops after all.''}}%
\end{table}


\subsection{Final attempt}

\makeatletter
\xdef\tmp{}

\def\MarkWord(#1/#2){%
\node[anchor=base west,inner sep=0pt] (a) at (\xa,#2) {#1};
\path (a.west);\pgfgetlastxy{\xa}{\ya}
 \xdef\tmp{\tmp(\xa,#2)}%
\path (a.base east) -- ++(1 ex,0) coordinate (a);
\path (a);
\pgfgetlastxy{\xa}{\ya}
\global\let\xa\xa
}

\def\util@empty{}

\def\multiwords#1 #2\@nil{%
 \protected@edef\@temp{%
   \noexpand\MarkWord(#1)}\@temp
   \def\@nextArg{#2}%
    \ifx\util@empty\@nextArg
       \let\next\@gobble
     \fi
   \next#2\@nil
    }

\def\MarkWords#1{%
  \begingroup
    \path (0,0) coordinate (a);
    \xdef\xa{0}
   \let\next\multiwords
   \next#1 \@nil %
\endgroup
}
\makeatother

\begin{tikzpicture}
    \MarkWords{Where/1 are/.2 you/.2 go/.6 ing?/0}
   \path[draw,red] (0,0) plot[smooth] coordinates{\tmp};
\end{tikzpicture}
\end{document}
