


(返信する前に読んでください:)ない2 番目の画像を別のサンプル画像に置き換えます。この投稿のポイントは、実際の画像を使用しようとしたときに直面した問題を示すことです。
ジオメトリ寸法の上部マージン パラメータに合わせて数字を下げる次のコードがあり、これにより、約 1 週間前に質問した問題 (画像がマージン境界を超えてしまう) は解決されましたが、このような処理を自動化し、数字を 0.02cm 下げるように指定せずに実行できるようにするにはどうすればよいでしょうか。
% {
\documentclass[letterpaper, 12pt]{article}
\usepackage{graphicx}
\usepackage{newfloat}
\usepackage[showframe, left=1.5cm, right=1.5cm, top=1.5cm, bottom=1.5cm]{geometry}
\usepackage{indentfirst}
\usepackage{fancyhdr}
\pagestyle{fancy}
\fancyhf{} % clear all header and footers
\cfoot{\thepage} % put the page number in the center footer
\renewcommand{\headrulewidth}{0pt} % remove the header rule
\addtolength{\footskip}{-.5cm} % shift the footer down which will shift the page number up
\usepackage[backend=biber]{biblatex}
\usepackage{subcaption}
\usepackage{adjustbox}
\usepackage{microtype}
\usepackage{csquotes}
\usepackage{lipsum}
\usepackage{unicode-math}
\setmainfont{Times New Roman}[Ligatures=TeX]
\setmathfont{STIX Two Math}
\usepackage[main=english,spanish]{babel}
\makeatletter
\renewcommand{\@maketitle}{%
\newpage
\null
\vspace{-0.125cm} % This corresponds to the top margin set by geometry
\begin{center}
\parskip=0pt
\let\footnote\thanks
{\LARGE \@title \par }%
\vspace{0cm} % Adjust this value to control the space between the title and author
{\large \lineskip .5em%
\begin{tabular}[t]{c}%
\@author
\end{tabular}%
\par }%
\vspace{.25cm} % Adjust this value to control the space between the author and date
{\large \@date }%
\end{center}\par
\vspace{.25cm} % Adjust this value to control the space between the date and content after maketitle
}
\makeatother % ask if you want to change the spacing of the 3 top sections
\renewcommand{\arraystretch}{1.5} % this makes tables look better
\setlength\parindent{.5cm}
% }
\title{Title Random}
\author{David Patterson}
\date{\today}
\begin{document}
\noindent
\begin{minipage}{\textwidth}
\maketitle
\end{minipage}
\begin{center}
\begin{large}
\textsc{\RN{1}. Introduction}
\end{large}
\end{center}
\lipsum[1]
\begin{figure}[htb]
\centering
\includegraphics[width=.5\textwidth]{example-image}
\caption*{Fig. 2: A random image.}
\label{example}
\end{figure}
\begin{center}
\begin{large}
\textsc{\RN{2}. Second Part}
\end{large}
\end{center}
\lipsum[2]
\newpage
\begin{figure}[htb]
\centering
\begin{adjustbox}{margin=.02cm}
\includegraphics[width=.4\textwidth]{04_figure.jpg}
\end{adjustbox}
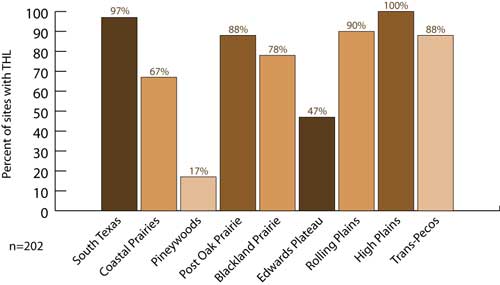
\caption*{Fig. 2: A statistic showing the population of the Texas Horned Lizard, with it having a low distribution percentage in the Pineywoods area.}
\label{Texas Horned Lizard}
\end{figure}
\end{document}

以下と比較して
% {
\documentclass[letterpaper, 12pt]{article}

\usepackage{graphicx}
\usepackage{newfloat}
\usepackage[showframe, left=1.5cm, right=1.5cm, top=1.5cm, bottom=1.5cm]{geometry}
\usepackage{indentfirst}
\usepackage{fancyhdr}
    \pagestyle{fancy}
    \fancyhf{} % clear all header and footers
    \cfoot{\thepage} % put the page number in the center footer
    \renewcommand{\headrulewidth}{0pt} % remove the header rule
    \addtolength{\footskip}{-.5cm} % shift the footer down which will shift the page number up
\usepackage[backend=biber]{biblatex}
\usepackage{subcaption}
\usepackage{adjustbox}
\usepackage{microtype}
\usepackage{csquotes}
\usepackage{lipsum}
\usepackage{unicode-math}
    \setmainfont{Times New Roman}[Ligatures=TeX]
    \setmathfont{STIX Two Math}
\usepackage[main=english,spanish]{babel}

\makeatletter
\renewcommand{\@maketitle}{%
\newpage
\null
\vspace{-0.125cm} % This corresponds to the top margin set by geometry
\begin{center}
\parskip=0pt
\let\footnote\thanks
{\LARGE \@title \par }%
\vspace{0cm} % Adjust this value to control the space between the title and author
{\large \lineskip .5em%
\begin{tabular}[t]{c}%
\@author
\end{tabular}%
\par }%
\vspace{.25cm} % Adjust this value to control the space between the author and date
{\large \@date }%
\end{center}\par
\vspace{.25cm} % Adjust this value to control the space between the date and content after maketitle
}
\makeatother % ask if you want to change the spacing of the 3 top sections

\renewcommand{\arraystretch}{1.5} % this makes tables look better

\setlength\parindent{.5cm}
% }

\title{Title Random}
\author{David Patterson}
\date{\today}

\begin{document}

\noindent
\begin{minipage}{\textwidth}
\maketitle
\end{minipage}

\begin{center}
\begin{large}
\textsc{\RN{1}. Introduction}
\end{large}
\end{center}

\lipsum[1]

\begin{figure}[htb]
    \centering
    \includegraphics[width=.5\textwidth]{example-image}
    \caption*{Fig. 2: A random image.}
    \label{example}
\end{figure}

\begin{center}
\begin{large}
\textsc{\RN{2}. Second Part}
\end{large}
\end{center}

\lipsum[2]

\newpage

\begin{figure}[htb]
    \centering
    \includegraphics[width=.4\textwidth]{04_figure.jpg}
    \caption*{Fig. 2: A statistic showing the population of the Texas Horned Lizard, with it having a low distribution percentage in the Pineywoods area.}
    \label{Texas Horned Lizard}
\end{figure}


\end{document}
そしてその結果

必要なことを自動的に実行できる設定はありますかadjustbox?私の例にある画像はこれです
答え1
例を大幅に削減すると次のようになります。
\documentclass{article}

\usepackage{graphicx,xcolor}
\usepackage[showframe, left=1.5cm, right=1.5cm, top=1.5cm, bottom=1.5cm]{geometry}

\begin{document}

\begin{figure}[htb]
    \centering
    \includegraphics[page=1,width=.4\textwidth]{example-image-a4-numbered}
    \caption{Test}
\end{figure}

\end{document}
このgeometryオプションはshowframeテキストエリアの上部のフレームラインを描画するようです内部テキストエリア。これは次の方法でも実行できます:
\documentclass{article}

\usepackage{xcolor}
\usepackage[showframe, left=1.5cm, right=1.5cm, top=1.5cm, bottom=1.5cm]{geometry}

\begin{document}

\noindent{\textcolor{red}{\raisebox{-\dp\strutbox}{\rule{.5\textwidth}{\textheight}}}}

\end{document}
以下は、拡大率 5000% の左上隅のスクリーンショットです。

代わりにパッケージを使用しますshowframe(フレームを背景に移動)。
\documentclass{article}

\usepackage{xcolor}
\usepackage[left=1.5cm, right=1.5cm, top=1.5cm, bottom=1.5cm]{geometry}
\usepackage[noframe]{showframe}
\AddToShipoutPictureBG{\ShowFramePicture}

\begin{document}

\noindent{\textcolor{red}{\raisebox{-\dp\strutbox}{\rule{.5\textwidth}{\textheight}}}}

\end{document}
正しい結果を表示します:

問題に戻ります。あなたの例では、showframe領域を視覚化するパッケージを使用すると、次のようになります。

したがって、私見では、問題はないが、ドイツの諺のアプローチである:「Wer viel misst, misst Mist.」(英語では、「たくさん測れば、ひどい測り方になる」)。言い換えれば、画像はテキスト領域の上部に正しく配置されているため、 にgeometry表示されるフレームが別のことを示唆している場合でも、の設定が尊重されますgeometry。
ところで、あなたの例は、何も失うことなく次のように短縮できたはずです。
\documentclass{article}

\usepackage{graphicx,xcolor}
\usepackage[showframe, left=1.5cm, right=1.5cm, top=1.5cm, bottom=1.5cm]{geometry}

\begin{document}

\begin{figure}[htb]
    \centering
    \includegraphics[width=.4\textwidth]{04_figure.jpg}
    \caption{Test}
\end{figure}
そしてさらに:
\documentclass{article}

\usepackage{graphicx,xcolor}
\usepackage[showframe, left=1.5cm, right=1.5cm, top=1.5cm, bottom=1.5cm]{geometry}

\begin{document}

\begin{figure}[htb]
    \centering
    \includegraphics[page=1,width=.4\textwidth]{example-image-a4-numbered}
    \caption{Test}
\end{figure}

\end{document}