


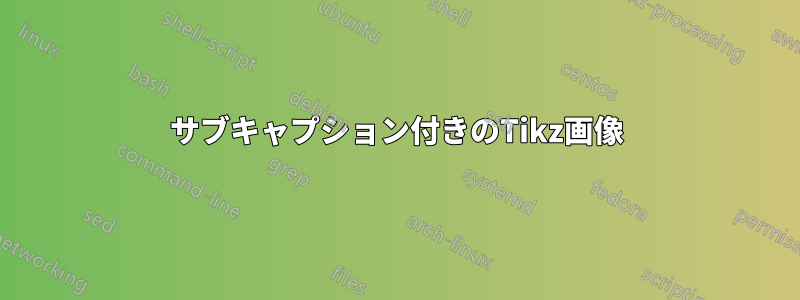
次のような図を作りたいと思います。

ここで似たような図のコードを受け取りましたサブフィギュアとキャプション付きのTikzpictureしかし、これを上記のように目的の形式に変更することはできません。
\documentclass{article}
\usepackage{caption}
\usepackage{subcaption}
\usepackage{tikz}

\begin{document}
\begin{figure}
    \centering
    \subcaptionbox{subfigure a}[\textwidth]{
    \begin{tikzpicture}
        \def\length{6}   % Length of your arrow
        \def\height{0.5} % Height of your intersections
        \draw[->] (-\length,0) -- (\length,0);
        \node at (-2*\length/3,0) [yshift=-4,anchor=north]{X};
        \node at ( 0,0)           [yshift=-4,anchor=north]{Y};
        \node at ( 2*\length/3,0) [yshift=-4,anchor=north]{Z};
        \draw[-] (-\length/3,-\height/2) -- (-\length/3,\height/2);
        \draw[-] ( \length/3,-\height/2) -- ( \length/3,\height/2);
    \end{tikzpicture}
    }
    \subcaptionbox{subfigure b}[\textwidth]{
    \begin{tikzpicture}
        \def\length{6}   % Length of your arrow
        \def\height{0.5} % Height of your intersections
        \draw[->] (-\length,0) -- (\length,0);
        \node at (-2*\length/3,0) [yshift=-4,anchor=north]{X};
        \node at ( 0,0)           [yshift=-4,anchor=north]{Y};
        \node at ( 2*\length/3,0) [yshift=-4,anchor=north]{Z};
        \draw[-] (-\length/3,-\height/2) -- (-\length/3,\height/2);
        \draw[-] ( \length/3,-\height/2) -- ( \length/3,\height/2);
    \end{tikzpicture}
    }
\end{figure}
\end{document}
答え1
私が使用している図の間隔subcaption block environmentを変更できる を使用することをお勧めします。また、この環境を使用して、キャプションをまたはのどちらに配置するかを制御することもできます。これは、キャプションを図面の前に配置するか後に配置するかによって定義されます。提案された図面の場合、スタイルと座標を何度も指定しなくても済むように、3 つの図面定義を作成しました。最初の を使用すると、指定された長さ (この場合はテキスト行 の幅) のとの間の係数を基準とした位置にマークを配置できます。これにより、マークをより適切に配置できます。各マークには 、、が必要です。 は、絶対座標を配置しないように他の図面定義に使用されます。vertical\captionsetup{skip=2em}belowabove\Xdoms01\linewidhtnamecontentcolornames
2 番目\Acotの は、 を使用して定義された 2 つのマーク間の寸法を描画します。 には、寸法が始まる場所となるおよびという名前付き座標があるnamesことを覚えておいてください。次に、コンテンツは( ) とパスのテキスト ノードに入ります。\xdoms2namename-upmiddlepos=0.5above
calc最後のものは、メソッドでtikz ライブラリを使用する中点「x」を配置するために使用されます。$(#1)!0.5!(#2)$名前としても入力できる 2 つのノード間の中点を特定し、円を描画してテキスト ノードを定義しますが、対応するテキストを配置する代わりに、特定の方向でノードからnode label一定の距離に配置できる を使用します。label distance=0.7em-90
これを行うことで、遊び場として追加のケースを含め、すべてのケースを描画できます。明らかに、最初に を使用し\xdoms、次に残りを使用する必要があります。これは、入力された各マークで作成された座標の名前を使用するためです。
結果:

MWE:
\documentclass{article}
\usepackage{caption}
\usepackage{subcaption}
\usepackage{tikz}
\usetikzlibrary{arrows.meta,calc}

\def\Xdoms#1#2#3{%\Xdoms{length}{height}{Markers{position/name/content/color}}
    \draw(0,0)--++(#1,0);
    \foreach \position/\name/\content/\color in {#3}{
        \draw[draw=\color,thick]
        (#1*\position,0)++(0,#2/2)
            -- ++(0,-#2) node[below, minimum height=2em,inner sep=0]{\content};
        \coordinate (\name-up) at (#1*\position,#2*1.5);
        \coordinate (\name) at (#1*\position,0);
    }
}

\def\Acot#1#2#3#4{
    \draw[draw=#4,|-|](#1)--(#2)node [pos=0.5,above]{#3};
}
\def\Dotx#1#2#3#4{
    \fill[fill=#4]($(#1)!0.5!(#2)$) circle (3.5pt) node[below,label={[label distance=0.7em,#4]-90:#3}]{};
}


\begin{document}
    \setcounter{figure}{4}
    \begin{figure}
        \centering
        \caption {figure name}
        \begin{subcaptionblock}{\textwidth}
            \begin{tikzpicture}
                \Xdoms{\linewidth}{0.5}{
                    0/Mk-0/0/black,%\position/\name/\content/\color
                    0.45/Mk-a/a/black,
                    0.65/Mk-b/b/black,
                    1/Mk-1/1/black%
                }
                \Acot{Mk-0-up}{Mk-a-up}{Text\_1}{red}
                \Acot{Mk-b-up}{Mk-1-up}{Text\_2}{blue}
                \Dotx{Mk-b}{Mk-1}{x}{black}
            \end{tikzpicture}
            \captionsetup{skip=2em}
            \caption{Sub figure a}
        \end{subcaptionblock}
        \begin{subcaptionblock}{\textwidth}
            \begin{tikzpicture}
                \Xdoms{\linewidth}{0.5}{
                    0/Mk-0/0/black,%\position/\name/\content/\color
                    0.5/Mk-a/a/black,
                    1/Mk-1/1/black%
                }
                \Acot{Mk-0-up}{Mk-a-up}{Text\_1}{red}
                \Acot{Mk-a-up}{Mk-1-up}{Text\_2}{blue}
                \Dotx{Mk-a}{Mk-1}{x}{black}
            \end{tikzpicture}
            \captionsetup{skip=2em}
            \caption{Sub figure b}
        \end{subcaptionblock}
        \begin{subcaptionblock}{\textwidth}
            \begin{tikzpicture}
                \Xdoms{\linewidth}{0.5}{
                    0/Mk-0/0/black,%\position/\name/\content/\color
                    1/Mk-1/1/black%
                }
                \Acot{Mk-0-up}{Mk-1-up}{Text\_2}{blue}
                \Dotx{Mk-0}{Mk-1}{x}{black}
            \end{tikzpicture}
            \captionsetup{skip=2em}
            \caption{Sub figure c}
        \end{subcaptionblock}
        \begin{subcaptionblock}{\textwidth}
            \begin{tikzpicture}
                \Xdoms{\linewidth}{0.5}{
                    0/AA/A/red,%\position/\name/\content/\color
                    0.1/BB/B/black!20!red,
                    0.3/CC/C/black!30!red,
                    0.4/DD/D/black!40!red,
                    0.5/EE/E/black!50!red,
                    0.75/FF/F/black!60!red,
                    1/GG/G/black!70!red%
                }
                \Acot{AA-up}{CC-up}{A TO C}{blue}
                \Acot{DD-up}{FF-up}{D TO F}{blue!50!red}
                \Dotx{AA}{BB}{x}{green!50!blue}
                \Dotx{EE}{FF}{y}{green!50!cyan}
            \end{tikzpicture}
            \captionsetup{skip=2em}
            \caption{Sub figure d playground}
        \end{subcaptionblock}
    \end{figure}
\end{document}
答え2
これがあなたのコードから得たものです。

サブキャプションに関連する問題が何なのかわかりません。tikzイラスト自体の問題ですか? まったく同じ図を取得したいのですか?
質問を明確にしてください。