


(Vor dem Antworten lesen:) Ich werdenichtErsetzen Sie das zweite Bild durch ein anderes Beispielbild. Der Sinn dieses Beitrags besteht darin, das Problem zu zeigen, auf das ich beim Versuch, ein echtes Bild zu verwenden, gestoßen bin.
ich habe den folgenden Code, der eine Zahl so verkleinert, dass sie meinem oberen Randparameter meiner Geometrieabmessungen entspricht. Dadurch wurde das Problem gelöst, das ich vor etwa einer Woche gestellt hatte (nämlich, dass das Bild über den Rand hinausging). Wie kann ich jedoch erreichen, dass so etwas automatisiert wird und ausgeführt wird, ohne anzugeben, dass ich meine Zahl um 0,02 cm verkleinern möchte?
% {
\documentclass[letterpaper, 12pt]{article}
\usepackage{graphicx}
\usepackage{newfloat}
\usepackage[showframe, left=1.5cm, right=1.5cm, top=1.5cm, bottom=1.5cm]{geometry}
\usepackage{indentfirst}
\usepackage{fancyhdr}
\pagestyle{fancy}
\fancyhf{} % clear all header and footers
\cfoot{\thepage} % put the page number in the center footer
\renewcommand{\headrulewidth}{0pt} % remove the header rule
\addtolength{\footskip}{-.5cm} % shift the footer down which will shift the page number up
\usepackage[backend=biber]{biblatex}
\usepackage{subcaption}
\usepackage{adjustbox}
\usepackage{microtype}
\usepackage{csquotes}
\usepackage{lipsum}
\usepackage{unicode-math}
\setmainfont{Times New Roman}[Ligatures=TeX]
\setmathfont{STIX Two Math}
\usepackage[main=english,spanish]{babel}
\makeatletter
\renewcommand{\@maketitle}{%
\newpage
\null
\vspace{-0.125cm} % This corresponds to the top margin set by geometry
\begin{center}
\parskip=0pt
\let\footnote\thanks
{\LARGE \@title \par }%
\vspace{0cm} % Adjust this value to control the space between the title and author
{\large \lineskip .5em%
\begin{tabular}[t]{c}%
\@author
\end{tabular}%
\par }%
\vspace{.25cm} % Adjust this value to control the space between the author and date
{\large \@date }%
\end{center}\par
\vspace{.25cm} % Adjust this value to control the space between the date and content after maketitle
}
\makeatother % ask if you want to change the spacing of the 3 top sections
\renewcommand{\arraystretch}{1.5} % this makes tables look better
\setlength\parindent{.5cm}
% }
\title{Title Random}
\author{David Patterson}
\date{\today}
\begin{document}
\noindent
\begin{minipage}{\textwidth}
\maketitle
\end{minipage}
\begin{center}
\begin{large}
\textsc{\RN{1}. Introduction}
\end{large}
\end{center}
\lipsum[1]
\begin{figure}[htb]
\centering
\includegraphics[width=.5\textwidth]{example-image}
\caption*{Fig. 2: A random image.}
\label{example}
\end{figure}
\begin{center}
\begin{large}
\textsc{\RN{2}. Second Part}
\end{large}
\end{center}
\lipsum[2]
\newpage
\begin{figure}[htb]
\centering
\begin{adjustbox}{margin=.02cm}
\includegraphics[width=.4\textwidth]{04_figure.jpg}
\end{adjustbox}
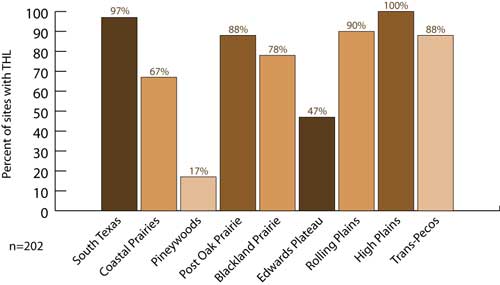
\caption*{Fig. 2: A statistic showing the population of the Texas Horned Lizard, with it having a low distribution percentage in the Pineywoods area.}
\label{Texas Horned Lizard}
\end{figure}
\end{document}

im Vergleich zu den folgenden
% {
\documentclass[letterpaper, 12pt]{article}

\usepackage{graphicx}
\usepackage{newfloat}
\usepackage[showframe, left=1.5cm, right=1.5cm, top=1.5cm, bottom=1.5cm]{geometry}
\usepackage{indentfirst}
\usepackage{fancyhdr}
    \pagestyle{fancy}
    \fancyhf{} % clear all header and footers
    \cfoot{\thepage} % put the page number in the center footer
    \renewcommand{\headrulewidth}{0pt} % remove the header rule
    \addtolength{\footskip}{-.5cm} % shift the footer down which will shift the page number up
\usepackage[backend=biber]{biblatex}
\usepackage{subcaption}
\usepackage{adjustbox}
\usepackage{microtype}
\usepackage{csquotes}
\usepackage{lipsum}
\usepackage{unicode-math}
    \setmainfont{Times New Roman}[Ligatures=TeX]
    \setmathfont{STIX Two Math}
\usepackage[main=english,spanish]{babel}

\makeatletter
\renewcommand{\@maketitle}{%
\newpage
\null
\vspace{-0.125cm} % This corresponds to the top margin set by geometry
\begin{center}
\parskip=0pt
\let\footnote\thanks
{\LARGE \@title \par }%
\vspace{0cm} % Adjust this value to control the space between the title and author
{\large \lineskip .5em%
\begin{tabular}[t]{c}%
\@author
\end{tabular}%
\par }%
\vspace{.25cm} % Adjust this value to control the space between the author and date
{\large \@date }%
\end{center}\par
\vspace{.25cm} % Adjust this value to control the space between the date and content after maketitle
}
\makeatother % ask if you want to change the spacing of the 3 top sections

\renewcommand{\arraystretch}{1.5} % this makes tables look better

\setlength\parindent{.5cm}
% }

\title{Title Random}
\author{David Patterson}
\date{\today}

\begin{document}

\noindent
\begin{minipage}{\textwidth}
\maketitle
\end{minipage}

\begin{center}
\begin{large}
\textsc{\RN{1}. Introduction}
\end{large}
\end{center}

\lipsum[1]

\begin{figure}[htb]
    \centering
    \includegraphics[width=.5\textwidth]{example-image}
    \caption*{Fig. 2: A random image.}
    \label{example}
\end{figure}

\begin{center}
\begin{large}
\textsc{\RN{2}. Second Part}
\end{large}
\end{center}

\lipsum[2]

\newpage

\begin{figure}[htb]
    \centering
    \includegraphics[width=.4\textwidth]{04_figure.jpg}
    \caption*{Fig. 2: A statistic showing the population of the Texas Horned Lizard, with it having a low distribution percentage in the Pineywoods area.}
    \label{Texas Horned Lizard}
\end{figure}


\end{document}
und das Ergebnis war

Gibt es eine Einstellung, adjustboxdie das, was ich brauche, automatisch erledigt? Das Bild in meinem Beispiel ist dieses hier.
Antwort1
Nachdem ich Ihr Beispiel stark reduziert habe auf:
\documentclass{article}

\usepackage{graphicx,xcolor}
\usepackage[showframe, left=1.5cm, right=1.5cm, top=1.5cm, bottom=1.5cm]{geometry}

\begin{document}

\begin{figure}[htb]
    \centering
    \includegraphics[page=1,width=.4\textwidth]{example-image-a4-numbered}
    \caption{Test}
\end{figure}

\end{document}
Ich habe festgestellt, dass geometrydiese Option showframedie obere Rahmenlinie des Textbereichs zu zeichnen scheintinnender Textbereich. Sie können dies auch tun mit:
\documentclass{article}

\usepackage{xcolor}
\usepackage[showframe, left=1.5cm, right=1.5cm, top=1.5cm, bottom=1.5cm]{geometry}

\begin{document}

\noindent{\textcolor{red}{\raisebox{-\dp\strutbox}{\rule{.5\textwidth}{\textheight}}}}

\end{document}
Hier ein Screenshot der oberen linken Ecke bei 5000 % Vergrößerung:

Stattdessen Paket verwenden showframe(und den Rahmen in den Hintergrund verschieben):
\documentclass{article}

\usepackage{xcolor}
\usepackage[left=1.5cm, right=1.5cm, top=1.5cm, bottom=1.5cm]{geometry}
\usepackage[noframe]{showframe}
\AddToShipoutPictureBG{\ShowFramePicture}

\begin{document}

\noindent{\textcolor{red}{\raisebox{-\dp\strutbox}{\rule{.5\textwidth}{\textheight}}}}

\end{document}
zeigt das richtige Ergebnis:

Zurück zu Deinem Problem: Mit Deinem Beispiel aber Paket showframezur Visualisierung der Flächen erhalte ich:

Es handelt sich meiner Meinung nach also nicht um ein Problem, sondern um eine Anlehnung an das Sprichwort „Wer viel misst, misst Mist.“ Mit anderen Worten: Das Bild wird korrekt oben im Textbereich platziert und beachtet daher die Einstellungen von , auch geometrywenn der von angezeigte Rahmen geometryetwas anderes suggeriert.
Übrigens: Ihr Beispiel hätte ohne Verluste wie folgt reduziert werden können:
\documentclass{article}

\usepackage{graphicx,xcolor}
\usepackage[showframe, left=1.5cm, right=1.5cm, top=1.5cm, bottom=1.5cm]{geometry}

\begin{document}

\begin{figure}[htb]
    \centering
    \includegraphics[width=.4\textwidth]{04_figure.jpg}
    \caption{Test}
\end{figure}
und sogar zu:
\documentclass{article}

\usepackage{graphicx,xcolor}
\usepackage[showframe, left=1.5cm, right=1.5cm, top=1.5cm, bottom=1.5cm]{geometry}

\begin{document}

\begin{figure}[htb]
    \centering
    \includegraphics[page=1,width=.4\textwidth]{example-image-a4-numbered}
    \caption{Test}
\end{figure}

\end{document}