


(답변하기 전에 읽어보세요 :)~ 아니다두 번째 사진을 다른 예시 이미지로 교체하세요. 이 게시물의 요점은 실제 이미지를 사용하려고 할 때 직면했던 문제를 보여주는 것입니다.
일주일 전에 질문한 문제(이미지가 여백 경계를 넘어섰다는 문제)를 해결한 형상 치수의 상단 여백 매개변수를 충족하기 위해 그림이 낮아진 다음 코드가 있지만 어떻게 그렇게 만들 수 있습니까? 이런 일이 자동화되어 있으며 내 체형을 0.02cm 낮추고 싶다고 명시하지 않고 수행된다고요?
% {
\documentclass[letterpaper, 12pt]{article}
\usepackage{graphicx}
\usepackage{newfloat}
\usepackage[showframe, left=1.5cm, right=1.5cm, top=1.5cm, bottom=1.5cm]{geometry}
\usepackage{indentfirst}
\usepackage{fancyhdr}
\pagestyle{fancy}
\fancyhf{} % clear all header and footers
\cfoot{\thepage} % put the page number in the center footer
\renewcommand{\headrulewidth}{0pt} % remove the header rule
\addtolength{\footskip}{-.5cm} % shift the footer down which will shift the page number up
\usepackage[backend=biber]{biblatex}
\usepackage{subcaption}
\usepackage{adjustbox}
\usepackage{microtype}
\usepackage{csquotes}
\usepackage{lipsum}
\usepackage{unicode-math}
\setmainfont{Times New Roman}[Ligatures=TeX]
\setmathfont{STIX Two Math}
\usepackage[main=english,spanish]{babel}
\makeatletter
\renewcommand{\@maketitle}{%
\newpage
\null
\vspace{-0.125cm} % This corresponds to the top margin set by geometry
\begin{center}
\parskip=0pt
\let\footnote\thanks
{\LARGE \@title \par }%
\vspace{0cm} % Adjust this value to control the space between the title and author
{\large \lineskip .5em%
\begin{tabular}[t]{c}%
\@author
\end{tabular}%
\par }%
\vspace{.25cm} % Adjust this value to control the space between the author and date
{\large \@date }%
\end{center}\par
\vspace{.25cm} % Adjust this value to control the space between the date and content after maketitle
}
\makeatother % ask if you want to change the spacing of the 3 top sections
\renewcommand{\arraystretch}{1.5} % this makes tables look better
\setlength\parindent{.5cm}
% }
\title{Title Random}
\author{David Patterson}
\date{\today}
\begin{document}
\noindent
\begin{minipage}{\textwidth}
\maketitle
\end{minipage}
\begin{center}
\begin{large}
\textsc{\RN{1}. Introduction}
\end{large}
\end{center}
\lipsum[1]
\begin{figure}[htb]
\centering
\includegraphics[width=.5\textwidth]{example-image}
\caption*{Fig. 2: A random image.}
\label{example}
\end{figure}
\begin{center}
\begin{large}
\textsc{\RN{2}. Second Part}
\end{large}
\end{center}
\lipsum[2]
\newpage
\begin{figure}[htb]
\centering
\begin{adjustbox}{margin=.02cm}
\includegraphics[width=.4\textwidth]{04_figure.jpg}
\end{adjustbox}
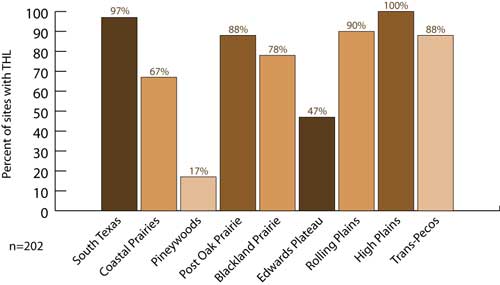
\caption*{Fig. 2: A statistic showing the population of the Texas Horned Lizard, with it having a low distribution percentage in the Pineywoods area.}
\label{Texas Horned Lizard}
\end{figure}
\end{document}

다음과 비교
% {
\documentclass[letterpaper, 12pt]{article}

\usepackage{graphicx}
\usepackage{newfloat}
\usepackage[showframe, left=1.5cm, right=1.5cm, top=1.5cm, bottom=1.5cm]{geometry}
\usepackage{indentfirst}
\usepackage{fancyhdr}
    \pagestyle{fancy}
    \fancyhf{} % clear all header and footers
    \cfoot{\thepage} % put the page number in the center footer
    \renewcommand{\headrulewidth}{0pt} % remove the header rule
    \addtolength{\footskip}{-.5cm} % shift the footer down which will shift the page number up
\usepackage[backend=biber]{biblatex}
\usepackage{subcaption}
\usepackage{adjustbox}
\usepackage{microtype}
\usepackage{csquotes}
\usepackage{lipsum}
\usepackage{unicode-math}
    \setmainfont{Times New Roman}[Ligatures=TeX]
    \setmathfont{STIX Two Math}
\usepackage[main=english,spanish]{babel}

\makeatletter
\renewcommand{\@maketitle}{%
\newpage
\null
\vspace{-0.125cm} % This corresponds to the top margin set by geometry
\begin{center}
\parskip=0pt
\let\footnote\thanks
{\LARGE \@title \par }%
\vspace{0cm} % Adjust this value to control the space between the title and author
{\large \lineskip .5em%
\begin{tabular}[t]{c}%
\@author
\end{tabular}%
\par }%
\vspace{.25cm} % Adjust this value to control the space between the author and date
{\large \@date }%
\end{center}\par
\vspace{.25cm} % Adjust this value to control the space between the date and content after maketitle
}
\makeatother % ask if you want to change the spacing of the 3 top sections

\renewcommand{\arraystretch}{1.5} % this makes tables look better

\setlength\parindent{.5cm}
% }

\title{Title Random}
\author{David Patterson}
\date{\today}

\begin{document}

\noindent
\begin{minipage}{\textwidth}
\maketitle
\end{minipage}

\begin{center}
\begin{large}
\textsc{\RN{1}. Introduction}
\end{large}
\end{center}

\lipsum[1]

\begin{figure}[htb]
    \centering
    \includegraphics[width=.5\textwidth]{example-image}
    \caption*{Fig. 2: A random image.}
    \label{example}
\end{figure}

\begin{center}
\begin{large}
\textsc{\RN{2}. Second Part}
\end{large}
\end{center}

\lipsum[2]

\newpage

\begin{figure}[htb]
    \centering
    \includegraphics[width=.4\textwidth]{04_figure.jpg}
    \caption*{Fig. 2: A statistic showing the population of the Texas Horned Lizard, with it having a low distribution percentage in the Pineywoods area.}
    \label{Texas Horned Lizard}
\end{figure}


\end{document}
그리고 그 결과

adjustbox필요한 작업을 자동으로 수행할 수 있는 설정이 있습니까 ? 내 예에 있는 이미지는 이것이다.
답변1
예제를 다음과 같이 많이 줄인 후:
\documentclass{article}

\usepackage{graphicx,xcolor}
\usepackage[showframe, left=1.5cm, right=1.5cm, top=1.5cm, bottom=1.5cm]{geometry}

\begin{document}

\begin{figure}[htb]
    \centering
    \includegraphics[page=1,width=.4\textwidth]{example-image-a4-numbered}
    \caption{Test}
\end{figure}

\end{document}
찾아보니 해당 geometry옵션이 showframe텍스트 영역의 상단 프레임선을 그리는 것 같습니다.내부에텍스트 영역. 다음을 사용하여 이를 수행할 수도 있습니다.
\documentclass{article}

\usepackage{xcolor}
\usepackage[showframe, left=1.5cm, right=1.5cm, top=1.5cm, bottom=1.5cm]{geometry}

\begin{document}

\noindent{\textcolor{red}{\raisebox{-\dp\strutbox}{\rule{.5\textwidth}{\textheight}}}}

\end{document}
다음은 배율 5000%의 왼쪽 상단 모서리 스크린샷입니다.

대신 패키지 사용 showframe(및 프레임을 배경으로 이동):
\documentclass{article}

\usepackage{xcolor}
\usepackage[left=1.5cm, right=1.5cm, top=1.5cm, bottom=1.5cm]{geometry}
\usepackage[noframe]{showframe}
\AddToShipoutPictureBG{\ShowFramePicture}

\begin{document}

\noindent{\textcolor{red}{\raisebox{-\dp\strutbox}{\rule{.5\textwidth}{\textheight}}}}

\end{document}
올바른 결과를 보여줍니다.

문제로 돌아가서: 예제를 사용하여 showframe영역을 시각화하는 패키지를 사용하면 다음을 얻습니다.

따라서 IMHO에는 문제가 없지만 "Wer viel misst, misst Mist"라는 독일 속담의 접근 방식이 있습니다. (영어: "많이 측정하면 쓰레기를 측정합니다.") 즉, 이미지는 텍스트 영역의 상단에 올바르게 배치되므로 geometry에 표시된 프레임이 geometry다르게 제안되더라도 의 설정을 따릅니다.
그런데: 당신의 예는 아무것도 잃지 않고 축소될 수 있었습니다:
\documentclass{article}

\usepackage{graphicx,xcolor}
\usepackage[showframe, left=1.5cm, right=1.5cm, top=1.5cm, bottom=1.5cm]{geometry}

\begin{document}

\begin{figure}[htb]
    \centering
    \includegraphics[width=.4\textwidth]{04_figure.jpg}
    \caption{Test}
\end{figure}
그리고 심지어:
\documentclass{article}

\usepackage{graphicx,xcolor}
\usepackage[showframe, left=1.5cm, right=1.5cm, top=1.5cm, bottom=1.5cm]{geometry}

\begin{document}

\begin{figure}[htb]
    \centering
    \includegraphics[page=1,width=.4\textwidth]{example-image-a4-numbered}
    \caption{Test}
\end{figure}

\end{document}