


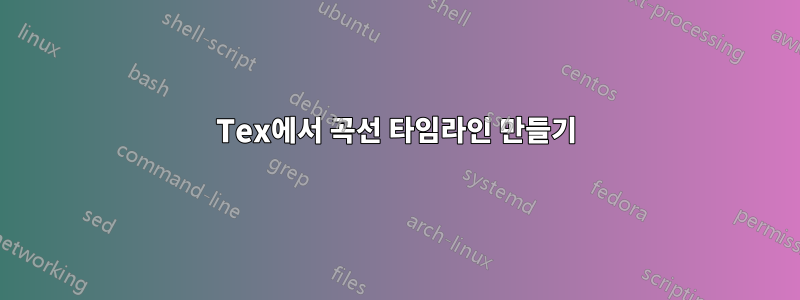
다음과 같이 곡선 화살표에 배치된 24개 시점을 포함하는 타임라인을 만들려고 합니다.

직선 화살표 버전(@Gonzalo Medina 제공)이 있지만 페이지 너비보다 길어서 위와 같이 곡선 타임라인을 갖고 싶습니다. 여러분의 도움을 요청하고 싶습니다. 매우 감사합니다.
\documentclass[a4]{article}
\usepackage[margin=0cm]{geometry}
\usepackage{ragged2e}
\usepackage{tikz}
\usetikzlibrary{chains,shapes.arrows,fit,calc}

\definecolor{arrowcolor}{RGB}{50,130,230}
\definecolor{circlecolor}{RGB}{79,129,189}
\colorlet{textcolor}{white}
\colorlet{bordercolor}{white}

\pgfdeclarelayer{background}
\pgfsetlayers{background,main}

\newcounter{task}

\newlength\taskwidth
\newlength\taskvsep

\setlength\taskwidth{2.5cm}
\setlength\taskvsep{17pt}

\def\taskpos{}
\def\taskanchor{}

\newcommand\task[1]{%
  {\parbox[t]{\taskwidth}{\scriptsize\Centering#1}}}

\tikzset{
inner/.style={
  on chain,
  circle,
  inner sep=1pt,
  fill=circlecolor,
  line width=0.5pt,
  draw=bordercolor,
},
on grid
}

\newcommand\Time[2][]{%
\node[inner xsep=0pt] (c1) {\phantom{A}};
\stepcounter{task}
\ifodd\thetask\relax
  \renewcommand\taskpos{\taskvsep}\renewcommand\taskanchor{south}
\else
  \renewcommand\taskpos{-\taskvsep}\renewcommand\taskanchor{north}
\fi
\node[inner,font=\footnotesize\sffamily\color{textcolor}]
  (c\the\numexpr\value{task}+1\relax) {#1};
\node[anchor=\taskanchor,yshift=\taskpos]
  at (c\the\numexpr\value{task}+1\relax) {\task{#2}};
}

\newcommand\drawarrow{a
\ifnum\thetask=0\relax
  \node[on chain] (c1) {};
\fi
\node[on chain] (f) {};
\begin{pgfonlayer}{background}
\node[
  inner sep=10pt,
  single arrow,
  single arrow head extend=0.5cm,
  draw=none,
  fill=arrowcolor,
  fit= (c1) (f)
] (arrow) {};
\fill[white]
  (arrow.before tail) -- (c1|-arrow.east) -- (arrow.after tail) -- cycle;
\end{pgfonlayer}
}

\newenvironment{timeline}[1][node distance=.5\taskwidth]
  {\par\noindent\begin{tikzpicture}[start chain,#1]}
  {\drawarrow\end{tikzpicture}\par}

\begin{document}

\begin{timeline}
\Time[1958]{Task 1}
\Time[1959]{Task 2}
\Time[1960]{Task 3}
\Time[1961]{Task 4}
\Time[1962]{Task 5}
\Time[1963]{Task 6}
\Time[1964]{Task 7}
\Time[1965]{Task 8}
\Time[1966]{Task 9}
\Time[1967]{Task 10}
\Time[1968]{Task 11}
\Time[1969]{Task 12}
\Time[1970]{Task 13}
\Time[1971]{Task 14}
\Time[1972]{Task 15}
\Time[1973]{Task 16}
\Time[1974]{Task 17}
\Time[1975]{Task 18}
\Time[1976]{Task 19}
\Time[1977]{Task 20}
\Time[1978]{Task 21}
\Time[1979]{Task 22}
\Time[1980]{Task 23}
\Time[1981]{Task 24}
\end{timeline}

\end{document}
참조:표준 타임라인을 어떻게 만들 수 있나요?[커뮤니티에서 추가함]
답변1
시작하려면...
여러 줄의 화살표의 경우
arrows.meta라이브러리를 사용하는 것이 좋습니다.% p.221 %\usetikzlibrary {arrows.meta} \tikz \draw [line width=1ex, {Triangle Cap[reversed]-{Latex[length=0pt +2]}}] (0,0) -- (1,0);task1, task2 레이블의 경우... 나는 in
\node also과 함께 사용합니다.label distance\tikzset
circle편집: 더 둥근 모양을 사용하여 a (와 함께 ) 를 사용 하고 시작 #2에 대해 #1 clip에 2개의 인수를 추가합니다 .bar arrow
\arrowvsep화살표 사이의 거리에 길이를 추가합니다.
코드
\documentclass[a4paper]{article}
% https://tex.stackexchange.com/questions/715875/create-a-curved-timeline-in-tex
\usepackage[showframe,margin=1cm]{geometry}
\usepackage{tikz}
\usetikzlibrary{arrows.meta}
\usetikzlibrary {positioning}
\usetikzlibrary {chains}
%  color
\definecolor{arrowcolor}{RGB}{50,130,230}
\definecolor{circlecolor}{RGB}{79,129,189}
\colorlet{textcolor}{white}
\colorlet{bordercolor}{white}
%  length
\newlength\taskwidth
\newlength\taskvsep
\newlength\arrowvsep%<-- added
\setlength\taskwidth{2.cm}
\setlength\taskvsep{1.5ex}
\setlength\arrowvsep{3.cm}
%
\begin{document}
%in th doc p.601
\begin{tikzpicture}[start chain,node distance=5mm]
    % The chain is called just "chain"
    \draw[help lines] (0,-1) grid (2,1);
    \node [on chain] {A};
    \node [on chain] {B};
    \node [on chain] {C};
\end{tikzpicture}

\vspace{1cm}
\begin{tikzpicture}[start chain,node distance=5mm]
    % The chain is called just "chain"
    \draw[help lines] (0,-1) grid (2,1);
    \node [on chain,circle,draw] {A};
    \node [on chain,circle,draw] {B};
    \node [on chain,circle,draw] {C};
\end{tikzpicture}

\vspace{1cm}
%\usetikzlibrary {positioning}
\begin{tikzpicture}[start chain,node distance=1cm,on grid]
    % The chain is called just "chain"
    \draw[help lines] (0,-1) grid (2,1);
    \node [on chain,circle,draw] {A};
    \node [on chain,circle,draw] {B};
    \node [on chain,circle,draw] {C};
\end{tikzpicture}

\vspace{1cm}
\begin{tikzpicture}[start chain=1 going right,
    start chain=2 going left,
    node distance=5mm,
    every node/.style=draw]
    \draw[help lines] (0,-2) grid (3,1);
    \node [on chain=1] {A};
    \node [on chain=1] {B};
    \node [on chain=1] (C){C};
    \node [on chain=2] at ([shift={(0.5cm,-1cm)}]C) {0};
    \node [on chain=2] {1};
    \node [on chain=2] {2};
    \end{tikzpicture}

\vspace{1cm}
        % p.221
        %\usetikzlibrary {arrows.meta}
        \tikz \draw [line width=1cm,
        {Triangle Cap[reversed]-{Latex[length=0pt +2]}}]
        (0,0) -- (5,0);


 \begin{tikzpicture}
    \draw [line width=1cm,
        {Triangle Cap[reversed]-}]
        (0,0) -- (5,0);
        \begin{scope}
            \clip (5,-3) rectangle (6.5,1.5);
            \draw[line width=1cm] (5,-1) circle[radius=1cm];
        \end{scope}
    \draw [line width=1cm,
        -{Latex[length=0pt +2]}]
        (5,-2) -- (0,-2);
 \end{tikzpicture}


\tikzset{
    node distance=1.5cm,
    on grid,
    bar height/.initial=1.2cm,
    bar arrow/.style args={#1/#2}%
        {%
            #1-#2,
            arrowcolor,
            line width=\pgfkeysvalueof{/tikz/bar height},
            %rounded corners=5mm
        },
    inner/.style=
        {
            %on chain,
            circle,
            inner sep=1pt,
            minimum width=1cm,
            fill=circlecolor,
            line width=0.5pt,
            draw=bordercolor,
            font=\footnotesize\sffamily\color{textcolor},
        },
    label distance=\taskvsep
}

\vspace{1cm}
\noindent\centering
\fbox{%<--- comment on the final document
    \begin{tikzpicture}
    [%
        trim left=-1.5cm,% begin of the arrow at -1.5
        start chain=1 going right,
        start chain=2 going left,
    ]
    \draw[help lines] (0,0) grid (15,-4);%<-- comment in the final doc
    % \draw[bar arrow] (-1.5,0) -- (15,0) -- ++(0,-\arrowvsep)--(-1.5,-\arrowvsep);
    \draw[bar arrow={Triangle Cap[reversed]/{}}] (-1.5,0) -- (14,0);
    \begin{scope}
        \clip (14,-3.7) rectangle (16.2,1.5);
        \draw[bar arrow={{}/{}}] (14,-0.5\arrowvsep) circle[radius=0.5\arrowvsep];
    \end{scope}
    \draw[bar arrow={{}/{{Latex[arrowcolor, length=0pt +2]}}}] (14,-\arrowvsep) -- (-0.5\arrowvsep,-\arrowvsep);

    \foreach \i/\d in{
        1/1958,
        2/1958,
        3/1960,
        4/1961,
        5/1962,
        6/1963,
        7/1964,
        8/1965,
        9/1966,
        10/1967}
        {
            \node[inner,on chain=1] (N_\i)  {\d};
            \node also [label=\ifodd\i above\else below\fi:task\i] (N_\i);
        }
    \node [on chain=2] at ([shift={(1cm,-\arrowvsep)}]N_10) {};
    \foreach \i in{11,...,19}
        {
            \node[inner,on chain=2] (N_\i) {Date\i};
            \node also [label=\ifodd\i below\else above\fi:task\i] (N_\i);
        }
    \end{tikzpicture}%
}
\end{document}

답변2
나는 이런 유형의 그래픽을 좋아했고 그것이 대용량 라벨을 인쇄하기 위해 가지고 있는 솔루션에 적합하다는 것을 알았습니다. 경로는 꼬리에서 시작하여 머리를 향해 부분적으로 그려지며, 행이 number of sections특정 값에 도달하면 각각의 곡선은 다음과 같습니다. 그려지고 섹션은 반대 방향으로 그려집니다. 섹션 수의 두 배 값을 완료한 후 다른 곡선이 그려지고 카운터가 재설정되어 경로가 자동으로 커지게 되고 최종적으로 헤드를 중지해야 합니다. 텍스트가 있을 때 본문을 그리는 대신 머리를 그리는 텍스트 데이터 입력에 대한 그림을 그리며, end이 경우 가거나 돌아올 때 2가지 옵션이 있고, 돌아오는 경우 를 배치해야 합니다 reverse. 반대방향으로 가는데 이걸 만들면서 이것저것 가져가면서 많이 배웠고 그래서 공유하고 주말에는 집에 있기 때문에.
데이터를 행으로 정렬할 수 있고 레이블을 생성하는 경우 Excel과 같은 데이터 시트를 사용하여 신속하게 얻을 수 있기 때문에 이러한 유형의 코드 구성을 수행합니다. 예를 들어 해당 tikz 코드 형식을 최종 상자로 내보냅니다.
특정 주제에 대해 챗봇으로 완성된 텍스트도 있었는데, 불편하지 않았으면 좋겠습니다.
결과:

MWE:
\documentclass[tikz,border=1cm]{standalone}
\usepackage{ifthen}
\usepackage{helvet}
\definecolor{arrowcolor}{RGB}{50,130,230}

\begin{document}
    \def\NTsize{\sf\bfseries\normalsize}
    \def\CTsize{\sf\bfseries\normalsize}

    \def\BODY#1#2#3#4#5#6#7#8#9{
        \begin{scope}[shift={(#1)},rotate=0,transform shape]
            \ifthenelse{\equal{#2}{end}}{%Draw The end Arrow Head
                \ifthenelse{\equal{#3}{reverse}}{
                    \filldraw[#6]%Reversed Arrow
                        (-1pt,#5*0.5+#7/2)
                            -- ++(#4*0.5+1pt,0)
                            -- ++ (0,3mm)
                            -- (#4,#5*0.5)
                            -- (#4*0.5,#5*0.5-#7/2-3mm)
                            -- ++(0,3mm)
                            -- ++(-#4*0.5-1pt,0);
                    }{
                    \filldraw[#6]%Normal Arrow
                        (#4+1pt,#5*0.5+#7/2)
                            -- ++(-#4*0.5-1pt,0)
                            -- ++ (0,3mm)
                            -- (0,#5*0.5)
                            -- (#4*0.5,#5*0.5-#7/2-3mm)
                            -- ++(0,3mm)
                            -- ++(#4*0.5+1pt,0);
                }
            }{% Draw the normal body
                \filldraw[#6] (0,#5*0.5+#7/2) rectangle ++(#4,-#7);
                \draw[white](#4*0.5,#5*0.5) node[circle,draw,fill=#6!70!black, minimum size=#7-3mm,font=\NTsize](temp){#2};
                \draw(temp)+(#8:#9) node[text width=#4-3mm, align=center,font=\CTsize](t2){#3};
                \draw[#6!40!white, preaction={draw,#6, line width=2pt}](temp)--(t2);
            }
        \end{scope}
    }

    \def\TAIL#1#2#3#4#5{
        \begin{scope}[shift={(#1)}]
            \filldraw[#4] (#2+1pt,#3*0.5+#5/2)-- ++(-#2*0.5-1pt,0) -- (#2*0.75,#3*0.5) -- (#2*0.5,#3*0.5-#5/2) -- ++ (1pt+#2*0.5,0);
        \end{scope}
    }

    \def\CURVE#1#2#3#4#5#6{
        \begin{scope}[shift={(#1)},#4,transform shape]
            \filldraw[#5](-1pt,#3*0.5-#6/2) -- ++(1pt,0) arc (90:-90:#3*0.5-#6/2) -- ++(-1pt,0)-- ++(0,-#6) -- ++(1pt,0) arc (-90:90:#3/2+#6/2)--++(-1pt,0);
        \end{scope}
    }

    \def\SNAKETEXT#1(#2)[#3][#4][#5]#6#7{%\SNAKETEXT{Contents}(Position)[x_dim][y_dim][colour]{tasks_per_line}{arrow size}
        \begin{scope}[shift={(#2)}]
            \edef\Shiftx{0}
            \edef\Shifty{0}
            \pgfmathparse{int(#6*2)}
            \xdef\tpl{\pgfmathresult}
            \foreach \cod/\direc/\dist/\desc [count=\ctr from 0] in {#1}{
                \ifnum\ctr=0
                    \TAIL{\Shiftx*#3,-\Shifty*#4-#4}{#3}{#4}{#5}{#7}
                \fi
                \ifnum\ctr<#6
                    \pgfmathparse{int(\Shiftx+1)}
                    \xdef\Shiftx{\pgfmathresult}
                    \BODY{\Shiftx*#3,-\Shifty*#4-#4}{\cod}{\desc}{#3}{#4}{#5}{#7}{\direc}{\dist}
                \fi
                \ifnum\ctr=#6
                    \pgfmathparse{int(\Shiftx+1)}
                    \xdef\Shiftx{\pgfmathresult}
                    \CURVE{\Shiftx*#3,-\Shifty*#4-#4}{#3}{#4}{}{#5}{#7}
                    \pgfmathparse{int(\Shiftx-1)}
                    \xdef\Shiftx{\pgfmathresult}
                    \pgfmathparse{int(\Shifty+1)}
                    \xdef\Shifty{\pgfmathresult}
                    \BODY{\Shiftx*#3,-\Shifty*#4-#4}{\cod}{\desc}{#3}{#4}{#5}{#7}{\direc}{\dist}
                \fi
                \ifnum\ctr>#6
                    \ifnum\ctr<\tpl
                        \pgfmathparse{int(\Shiftx-1)}
                        \xdef\Shiftx{\pgfmathresult}
                        \BODY{\Shiftx*#3,-\Shifty*#4-#4}{\cod}{\desc}{#3}{#4}{#5}{#7}{\direc}{\dist}
                    \fi
                \fi
                \ifnum\ctr=\tpl
                    \pgfmathparse{int(\Shiftx-1)}
                    \xdef\Shiftx{\pgfmathresult}
                    \CURVE{\Shiftx*#3+#3,-\Shifty*#4-#4}{#3}{#4}{xscale=-1}{#5}{#7}
                    \pgfmathparse{int(\Shifty+1)}
                    \xdef\Shifty{\pgfmathresult}
                    \pgfmathparse{int(\Shiftx+1)}
                    \xdef\Shiftx{\pgfmathresult}
                    \BODY{\Shiftx*#3,-\Shifty*#4-#4}{\cod}{\desc}{#3}{#4}{#5}{#7}{\direc}{\dist}
                    \xdef\ctr{0}
                \fi
            }
        \end{scope}
    }

    \begin{tikzpicture}
        \SNAKETEXT{
            task1/90/20mm/Detail of task 1,
            task2/-90/20mm/Detail of task 2,
            task3/90/20mm/Detail of task 3,
            task4/-90/20mm/Detail of task 4,
            task5/90/23mm/Some manual text input for more details,
            task6/-90/23mm/Become a Professional Procrastinator,
            task7/90/20mm/Organize Your Clutter,
            task8/-90/20mm/Master the Art of Napping,
            task9/90/20mm/Attend a Productivity Seminar,
            task10/-90/23mm/Create a To-Do List for Doing Nothing,
            task11/-90/20mm/Practice Active Inactivity,
            task12/90/20mm/Become an Expert at Waiting,
            task13/-90/20mm/Write a Book on Doing Nothing,
            task14/90/20mm/Achieving Zen in Pajamas,
            task15/-90/20mm/Watch 10 Hours of Cat Videos,
            task16/90/23mm/Reorganized My Sock Drawer Instead of Studying,
            task17/-90/30mm/Dedicate hours each day to scrolling through social media feeds.,
            task18/90/25mm/Spend hours contemplating the meaning of life,
            task19/-90/20mm/Some task like doing nothing,
            end/end/end/end%
        }(0,0)[25mm][50mm][arrowcolor]{10}{20mm}

        %Changing the font sizes
        \def\NTsize{\sf\bfseries\scriptsize}
        \def\CTsize{\sf\bfseries\scriptsize}
        \SNAKETEXT{
            JAN-30/-90/15mm/Polar Bear Plunge Day,
            FEB-29/90/15mm/International Lost Sock Memorial Day,
            MAR-13/-90/15mm/Global Labyrinth Day,
            APR-30/90/15mm/National Awkward Silence Appreciation Day,
            MAY-15/-90/15mm/World Emoji Day,
            JUN-07/-90/15mm/National Talk Like a Pirate Day,
            JUL-15/90/15mm/Global Prohibition Day,
            AUG-12/-90/15mm/National Overthinking Awareness Weeky,
            SEP-06/90/15mm/World Couch Potato Championship,
            OCT-17/-90/15mm/National Socks-with-Sandals Day,
            NOV-28/-90/15mm/ Global Pajama Conference,
            DEC-25/90/15mm/World Simultaneous Eye Roll Day ,
            end/end/end/reverse%
        }(0,-13)[25mm][30mm][green!50!black]{5}{15mm}

        %Changing the font sizes
        \def\NTsize{\sf\bfseries\tiny}
        \def\CTsize{\sf\bfseries\tiny}
        \SNAKETEXT{
            A/90/5mm/cmt-stg1,
            B/90/5mm/cmt-stg2,
            C/90/5mm/cmt-stg3
            D/90/5mm/cmt-stg4,
            E/90/5mm/cmt-stg5,
            F/90/5mm/cmt-stg6,
            G/90/5mm/cmt-stg7,
            H/90/5mm/cmt-stg8,
            I/90/5mm/cmt-stg9,
            J/90/5mm/cmt-stg10,
            K/90/5mm/cmt-stg11,
            L/90/5mm/cmt-stg12,
            M/90/5mm/cmt-stg13,
            N/90/5mm/cmt-stg14,
            M/90/5mm/cmt-stg15,
            O/90/5mm/cmt-stg16,
            end/end/end/end%
        }(18,-11)[20mm][10mm][cyan!50!green]{2}{5mm}

        %Changing the font sizes
        \def\NTsize{\sf\bfseries\tiny}
        \def\CTsize{\sf\bfseries\tiny}
        \SNAKETEXT{
            A/90/5mm/cmt-stg1,
            B/90/5mm/cmt-stg2,
            C/90/5mm/cmt-stg3
            D/90/5mm/cmt-stg4,
            E/90/5mm/cmt-stg5,
            F/90/5mm/cmt-stg6,
            G/90/5mm/cmt-stg7,
            H/90/5mm/cmt-stg8,
            I/90/5mm/cmt-stg9,
            J/90/5mm/cmt-stg10,
            K/90/5mm/cmt-stg11,
            L/90/5mm/cmt-stg12,
            M/90/5mm/cmt-stg13,
            N/90/5mm/cmt-stg14,
            M/90/5mm/cmt-stg15,
            O/90/5mm/cmt-stg16,
            P/90/5mm/cmt-stg17,
            Q/90/5mm/cmt-stg18,
            end/end/end/reverse%
        }(24,-11)[20mm][10mm][red!50!blue]{2}{5mm}
    \end{tikzpicture}
\end{document}