


程式碼
\documentclass{article}
\usepackage{tikz}
\begin{document}
  \begin{tikzpicture}[font=\footnotesize, very thick]
  \def\r{3}
  \foreach \a/\n in {-2/{p-2}, -1/{p-1}, 0/0, 1/1, 2/2, 3/3, 4/4}
     \node[anchor=base] (\a) at (90+36*\a:\r) {$\circ$};
  \node (-3) at (90+36*-3:\r) {};
  \node (5) at (90+36*5:\r) {};
  \foreach \a/\name [remember=\a as \lasta (initially -3)]
                in {-2/{p-3}, -1/{p-2}, 0/{p-1}, 1/0, 2/1, 3/2, 4/3, 5/4}
    {
    \draw[->, shorten >=5pt, shorten <=5pt]
        (\lasta)
        arc[radius=\r, start angle=90+36*(\lasta), end angle=90+36*(\a)]
        (\a);
    \node at (90+36*\lasta+18:\r+0.5) {$\alpha_{\name}$};
    }
  \foreach \a in { 1, ..., 14 }
    {
    \node at (90+36*5+5*\a:\r) {$\cdot$};
    }
  \end{tikzpicture}
\end{document}
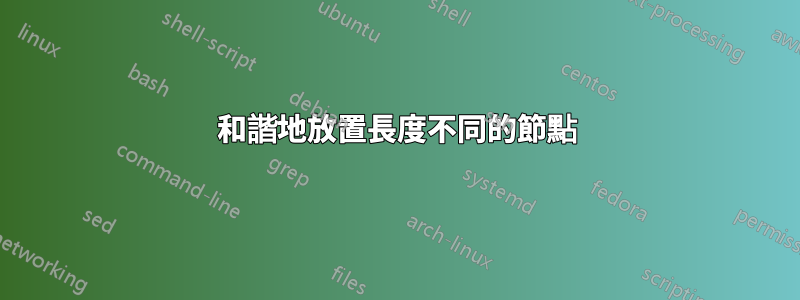
產生以下圖片

我發現箭頭上的標籤相當令人不安。我嘗試了很多東西,但它們總是以相當不對稱的位置結束。
有沒有辦法讓他們表現良好?
當然,正確的意思是出色地這裡可以進行解釋,但例如,我至少希望阿爾法顯示在距離箭頭更一致的距離。
附言。我手動放置標籤,而不是沿著弧線作為節點,因為這樣它們看起來更好,但我認為這是一個糟糕的選擇...
答案1
我會為該點設定錨點。
\documentclass[border=25pt]{standalone}
\usepackage{tikz}
\newcommand\aesub[1]{\makebox[0pt][l]{\raisebox{0pt}[\height][0pt]{\scriptsize$#1$}}}
\begin{document}
  \begin{tikzpicture}[font=\footnotesize, very thick]
  \def\r{3}
  \foreach \a/\n in {-2/{p-2}, -1/{p-1}, 0/0, 1/1, 2/2, 3/3, 4/4}
     \node[anchor=base] (\a) at (90+36*\a:\r) {$\circ$};
  \node (-3) at (90+36*-3:\r) {};
  \node (5) at (90+36*5:\r) {};
  \foreach \a/\name [remember=\a as \lasta (initially -3)]
                in {-2/{p-3}, -1/{p-2}, 0/{p-1}, 1/0, 2/1, 3/2, 4/3, 5/4}
    {
    \draw[->, shorten >=5pt, shorten <=5pt]
        (\lasta)
        arc[radius=\r, start angle=90+36*(\lasta), end angle=90+36*(\a)]
        (\a);
    %% to avoid writing the same thing multiple times
    \pgfmathsetmacro\aeangle{90+36*\lasta+18}
    %% to see the node
    \node[circle,inner sep=0.5pt,fill] at (\aeangle:\r+0.5) {};
    \node[anchor=(\aeangle+180),outer sep=0pt,inner sep=0pt] at (\aeangle:\r+0.5) {$\alpha_{\aesub{\name}}$};
    %% old style for comparison purposes
    %% \node[anchor=(\aeangle+180),outer sep=0pt,inner sep=0pt] at (\aeangle:\r+0.5) {$\alpha_{\name}$};
    }
  \foreach \a in { 1, ..., 14 }
    {
    \node at (90+36*5+5*\a:\r) {$\cdot$};
    }
  \end{tikzpicture}
\end{document}

我已使節點可見,以便您可以更好地看到其位置。只需註解掉該行即可。另外,我添加了一個命令,使下標成為零寬度、自然高度和零深度的框:自然高度保留在那裡,以便下標放置正確(即,不太高)。這會產生不太理想的結果,即邊界框未完全設定。但除此之外,該解決方案將錨點設定在 $\alpha$ 上,而不是整個 $\alpha_{...}$ 上。如果您發現對整個標籤名稱進行了設置,則不要使用該\aesub巨集。
答案2
這樣看起來是不是比較美觀呢?

\documentclass{article}
\usepackage{tikz}

\newlength{\tempwidth}

\begin{document}
  \begin{tikzpicture}[font=\footnotesize, very thick]
  \def\r{3}
  \foreach \a/\n in {-2/{p-2}, -1/{p-1}, 0/0, 1/1, 2/2, 3/3, 4/4}
     \node[anchor=base] (\a) at (90+36*\a:\r) {$\circ$};
  \node (-3) at (90+36*-3:\r) {};
  \node (5) at (90+36*5:\r) {};
  \foreach \a/\name [remember=\a as \lasta (initially -3)]
                in {-2/{p-3}, -1/{p-2}, 0/{p-1}, 1/0, 2/1, 3/2, 4/3, 5/4}
    {
    \draw[->, shorten >=5pt, shorten <=5pt]
        (\lasta)
        arc[radius=\r, start angle=90+36*(\lasta), end angle=90+36*(\a)]
        (\a);
    \pgfextra{\settowidth{\tempwidth}{$\alpha_{\name}$}
       \pgfmathparse{0.5+0.005\tempwidth*cos(90+36*\lasta+18)}% fudge factor 0.005
       \global\let\temp=\pgfmathresult}
     \node at (90+36*\lasta+18:\r+\temp) {$\alpha_{\name}$};
    }
  \foreach \a in { 1, ..., 14 }
    {
    \node at (90+36*5+5*\a:\r) {$\cdot$};
    }
  \end{tikzpicture}
\end{document}
這裡的 alpha 是對稱的(下標被忽略)。

\documentclass{standalone}
\usepackage{tikz}

\newlength{\tempwidth}

\begin{document}
  \begin{tikzpicture}[font=\footnotesize, very thick]
  \def\r{3}
  \foreach \a/\n in {-2/{p-2}, -1/{p-1}, 0/0, 1/1, 2/2, 3/3, 4/4}
     \node[anchor=base] (\a) at (90+36*\a:\r) {$\circ$};
  \node (-3) at (90+36*-3:\r) {};
  \node (5) at (90+36*5:\r) {};
  \foreach \a/\name [remember=\a as \lasta (initially -3)]
                in {-2/{p-3}, -1/{p-2}, 0/{p-1}, 1/0, 2/1, 3/2, 4/3, 5/4}
    {
    \draw[->, shorten >=5pt, shorten <=5pt]
        (\lasta)
        arc[radius=\r, start angle=90+36*(\lasta), end angle=90+36*(\a)]
        (\a);
     \node at (90+36*\lasta+18:\r+0.5) {$\alpha_{\rlap{$\scriptstyle\name$}}$};
    }
  \foreach \a in { 1, ..., 14 }
    {
    \node at (90+36*5+5*\a:\r) {$\cdot$};
    }
  \node at (3.5,0) {\phantom{$alpha_{p-3}$}};% push right border
  \end{tikzpicture}
\end{document}