


我有以下程式碼:
\documentclass{standalone}
\usepackage{tikz}
\usepackage{pgfplots}
\usepackage[active,float]{preview}
\usetikzlibrary{calc}
\usetikzlibrary{graphs,plotmarks,arrows,automata,positioning,fit,shapes.geometric,backgrounds}
\usepackage{graphicx}
\PreviewEnvironment{tikzpicture}
\usetikzlibrary{plotmarks}

\begin{document}
\begin{tikzpicture}[x=0.8cm,y=0.5cm]
    %axis
    \draw (0,0) -- coordinate (x axis mid) (10,0);
        \draw (0,0) -- coordinate (y axis mid) (0,12);

        %ticks
        \foreach \x in {0,...,10}
        \draw (\x,0pt) -- (\x,-3pt)     node[anchor=north] {\x};
        \foreach \y in {0,...,12}
            \draw (0pt,\y) -- (-3pt,\y)     node[anchor=east] {\y};

    %labels
    \node[below=0.8cm,xshift=0.3cm,scale=1.5] at (x axis mid) {$\sum{t_i}\;\;\longrightarrow$};

    % plot first concave function
    \draw[mark=square*,green,thick,mark options={fill=green}] (0,2) -- (1,3) -- (2,4) -- (3,5) -- (4,5) -- (5,5) -- (6,5) -- (7,5) -- (8,5) -- (9,3) -- (10,1);

    \node[mark=square*,green,thick,mark options={fill=green}] at (4,5) {};

    % plot second concave function
    \draw[mark=square*,red,thick,mark options={fill=red}] (0,1) -- (1,2) -- (2,3) -- (3,4) -- (4,5) -- (5,6) -- (6,6) -- (7,5) -- (8,4) -- (9,3) -- (10,2);

    % plot third concave function
    \draw[mark=*,blue,thick,mark options={fill=blue}] (0,3) -- (1,5) -- (2,7) -- (3,9) -- (4,10) -- (5,11) -- (6,11) -- (7,10) -- (8,9) -- (9,6) -- (10,3);

    %legend
    \begin{scope}[shift={(0.5,10)}]
    \draw[yshift=3\baselineskip] (0,0) --
        plot[mark=square*, mark options={fill=red}] (0.25,0) -- (0.5,0) node[right]{$f(t)$};
    \draw[yshift=2\baselineskip] (0,0) --
        plot[mark=square*, mark options={fill=green}] (0.25,0) -- (0.5,0) node[right]{$g(t)$};
    \draw[yshift=\baselineskip] (0,0) --
        plot[mark=square*, mark options={fill=blue}] (0.25,0) -- (0.5,0) node[right]{$f(t) + g(t)$};
    \end{scope}
\end{tikzpicture}

\end{document}
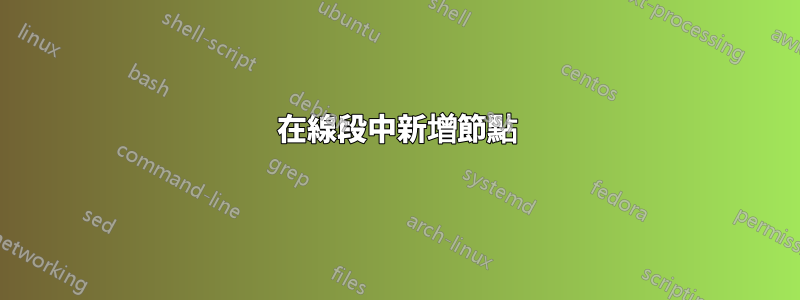
代表下圖:

我在執行以下操作時遇到問題:
顯示 xy 軸上的數字,步長為 2
由於某種原因,我無法視覺化線段之間的節點
無法在圖例周圍新增矩形區域。
答案1
正如評論和 Harish 的回答中提到的,使用pgfplots允許您指定一次樣式並在文件中重複使用它,而不是為每個繪圖重新發明輪子。
我創建了一個可以在任何繪圖中使用的cycle list呼叫(可以循環繪圖樣式。mycyclecycle list name=mycycle
其餘的樣式是在環境選項中完成的axis,但這很容易打包在 TikZ 樣式中,以便在任何其他圖中重複使用。
\documentclass[tikz]{standalone}
\usepackage{pgfplots}
\pgfplotsset{compat=1.12}
\pgfplotscreateplotcyclelist{mycycle}{%
  green!70!black,every mark/.append style={fill=green!80},mark=diamond*\\%
    red!70!black,every mark/.append style={fill=  red!80},mark=square*\\%
   blue!70!black,every mark/.append style={fill= blue!80},mark=*\\%
}

\begin{document}
\begin{tikzpicture}
\begin{axis}[
  axis lines=left,
  ymin=0,ymax=13.75,
  tick align=inside,
  axis line style={-},
  cycle list name=mycycle,
  legend pos=north west,
  legend cell align=left,
  legend style={
    outer sep=-0.2em,
    inner sep=0.2em,
    node font=\small,
  },
  xlabel={$\sum{t_i}\;\;\longrightarrow$},
]
  \addplot coordinates {
    (0,2) (1,3) (2,4) (3,5) (4,5) (5,5) (6,5) (7,5) (8,5) (9,3) (10,1)
  };
  \addlegendentry{$f(t)$};
  \addplot coordinates {
    (0,1) (1,2) (2,3) (3,4) (4,5) (5,6) (6,6) (7,5) (8,4) (9,3) (10,2)
  };
  \addlegendentry{$g(t)$};
  \addplot coordinates {
    (0,3) (1,5) (2,7) (3,9) (4,10) (5,11) (6,11) (7,10) (8,9) (9,6) (10,3)
  };
  \addlegendentry{$f(t)+g(t)$};
\end{axis}
\end{tikzpicture}
\end{document}

答案2
為什麼不用於pgfplots此類工作?無論如何,要在圖例周圍繪製方框,您可以使用fit庫。的語法plot不同。要獲得繪圖標記,您應該使用具有正確語法的座標。為了取得倍數的刻度標籤,2將 foreach 迴圈改為{0,2,...,12}。
\documentclass{standalone}
\usepackage{tikz}
\usepackage{pgfplots}
\usetikzlibrary{calc}
\usetikzlibrary{graphs,plotmarks,arrows,automata,positioning,fit,shapes.geometric,backgrounds}
\usetikzlibrary{plotmarks,fit}

\begin{document}
\begin{tikzpicture}[x=0.8cm,y=0.5cm]
    %axis
    \draw (0,0) -- coordinate (x axis mid) (10,0);
        \draw (0,0) -- coordinate (y axis mid) (0,12);

        %ticks
        \foreach \x in {0,2,...,10}
        \draw (\x,0pt) -- (\x,-3pt)     node[anchor=north] {\x};
        \foreach \y in {0,2,...,12}
            \draw (0pt,\y) -- (-3pt,\y)     node[anchor=east] {\y};

    %labels
    \node[below=0.8cm,xshift=0.3cm,scale=1.5] at (x axis mid) {$\sum{t_i}\;\;\longrightarrow$};

    % plot first concave function
    \draw[green,thick,] plot[mark=square*,mark options={fill=green}] coordinates{(0,2)  (1,3)  (2,4)  (3,5) (4,5)  (5,5)  (6,5)  (7,5)  (8,5) (9,3)  (10,1)};

    \node[mark=square*,green,thick,mark options={fill=green}] at (4,5) {};

    % plot second concave function
    \draw[red,thick] plot[mark=square*,mark options={fill=red}] coordinates {(0,1)  (1,2)  (2,3) (3,4)  (4,5)  (5,6)  (6,6)  (7,5)  (8,4)  (9,3)  (10,2)};

    % plot third concave function
    \draw[blue,thick] plot [mark=*,mark options={fill=blue}] coordinates{(0,3)  (1,5)  (2,7)  (3,9)  (4,10)  (5,11)  (6,11)  (7,10)  (8,9)  (9,6)  (10,3)};

    %legend
    \begin{scope}[shift={(0.5,10)}]
    \draw[yshift=3\baselineskip] (0,0) node(a){} --
        plot[mark=square*, mark options={fill=red}] (0.25,0) -- (0.5,0) node[right]{$f(t)$};
    \draw[yshift=2\baselineskip] (0,0) --
        plot[mark=square*, mark options={fill=green}] (0.25,0) -- (0.5,0) node[right]{$g(t)$};
    \draw[yshift=\baselineskip] (0,0) --
        plot[mark=square*, mark options={fill=blue}] (0.25,0) -- (0.5,0) node[right](fg){$f(t) + g(t)$};
    \node[draw,fit=(a) (fg)] {};
    \end{scope}
\end{tikzpicture}

\end{document}

順便說一句,您不需要preview使用類別明確打包standalone。