


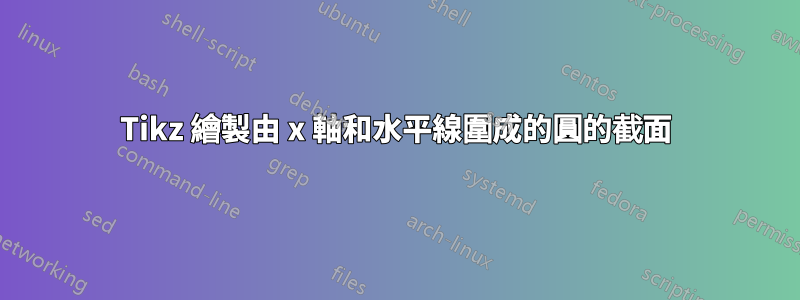
我是 tikz 的新手,我想繪製以下陰影區域,該區域由線 y = 1、x 軸和由 x^2 + y^2 <= 2 定義的圓包圍。我該怎麼做呢?

答案1
一般來說,我建議遵循 Tobi 給予的建議,但這很簡單,所以我還是會回答。我還要指出,如果您還沒有查看本文開頭的教程TikZ 手冊,我建議這樣做。其中第一部分(第 2 章)將教您製作此類圖表所需的一切。
我想繪製軸應該不是問題,這只是兩條直線。
對於截斷的圓,它由兩條圓弧和兩條直線組成。要繪製圓弧,您可以使用
arc[start angle=<degrees>, end angle=<degrees>, radius=<length>]
它將逆時針繪製從start angle到 的圓的一部分end angle。 (您也可以執行arc[start angle=<degrees>, delta angle=<degrees>, radius=<length>],其中delta angle表示弧長(以度為單位)。)
假設您開始在圓的最右邊的點上繪製。你知道那是在(2,0),所以你從
\draw (2,0) ...
您想要在該點下方添加一個標籤,雖然可以稍後添加,但在本例中同時添加它可能同樣方便。使用以下命令新增文字node [<options>] {<text>}:
\draw (2,0) node[below] {2} ...
(如果單獨新增節點,可以這樣做\node [<options>] at (<coordinate>) {<text>};。)
從那裡您想要繪製一條覆蓋 30 度的弧(因為 sin(30) = 0.5),從零角度開始。按照上面所說的:
\draw (2,0) node[below] {2}
       arc[start angle=0, end angle=30, radius=2] node[right] {1}...
我還在該弧的端點右側添加了一個標籤。
下一部分是在左側圓弧開始的位置繪製一條直線。雖然您可以手動或直接在座標中計算 x/y 座標,但使用極座標更方便,用 指定(<angle> : <radius>):
  \draw (2,0) node[below] {2}
        arc[start angle=0, end angle=30, radius=2] node[right] {1}
        -- (150:2) ...
現在,您只需繪製第二條弧線,添加node標籤,最後畫一條直線回到起點。繪製閉合路徑時,不要重複第一個座標,而是使用cycle:
\draw (2,0) node[below] {2}
        arc[start angle=0, end angle=30, radius=2] node[right] {1}
        -- (150:2)
        arc[start angle=150, end angle=180, radius=2] node[below] {2}
        -- cycle;
\draw單獨只給你一條黑線,但你可以指定顏色並填滿選項:
\filldraw [
  fill=brown!80!black,
  draw=red,
  very thick
  ]
  (2,0) node[below] {2}
        arc[start angle=0, end angle=30, radius=2] node[right] {1}
        -- (150:2)
        arc[start angle=150, end angle=180, radius=2] node[below] {2}
        -- cycle;
(在本例中同時指定 和 時,使用代替並不是絕對必要的\filldraw。)\drawfill=<color>draw=<color>

\documentclass[border=5mm]{standalone}
\usepackage{tikz}
\begin{document}
\begin{tikzpicture}

\path [
  fill=brown!80!black,
  draw=red,
  very thick
  ]
  (2,0) node[below] {2}
        arc[start angle=0, end angle=30, radius=2] node[right] {1}
        -- (150:2)
        arc[start angle=150, end angle=180, radius=2] node[below] {2}
        -- cycle;


\draw [thick] (-3,0) -- (3,0);
\draw [thick] (0,-2) -- (0,2);
\end{tikzpicture}
\end{document}
答案2
增加了 tkz-euclide 的答案

\documentclass{article} % or another class
\usepackage{xcolor} % before tikz or tkz-euclide if necessary

\usepackage{tkz-euclide} % no need to load TikZ

\usetikzlibrary{babel} %if there are problems with the active characters
\begin{document}

\begin{tikzpicture}

    %define the origin O -- radius A
    \tkzDefPoint(0,0){O}
    \tkzDefPoint(1.41,0){A}
    \tkzDrawPoints(O,A)
    \tkzLabelPoints[below](O,A)

    %draw the semicircle
    \tkzDefPointBy[rotation= center O angle 180](A)
    \tkzGetPoint{B}
    \tkzDrawArc[line width=0.1pt, white](O,A)(B)
    \tkzLabelPoints[below](B)
    %draw the line at y=1
    \tkzDefPoint(1,0){A'}
    \tkzDefPoint(-1,0){B'}
    \tkzDefShiftPoint[A'](90:1){A''}
    \tkzDefShiftPoint[B'](90:1){B''}
    \tkzDrawSegment[red,line width=1pt](A'',B'')
    %draw the arc perimeter line
    \tkzDrawArc[red,line width=1pt](O,A)(A'')
    \tkzDrawArc[red,line width=1pt](O,B'')(B)
    %color the fill inside
    \fill[red!40] (-1,0) rectangle (1,1);
    \tkzFillSector[rotate,color=red!40](O,A)(45)
    \tkzFillSector[rotate,color=red!40](O,B)(-45)
    %draw the center axis -horizontal and vertical
    \tkzDrawLine(A,B)
    \tkzDefLine[orthogonal =through O](B,A)\tkzGetPoint{X}
    \tkzDrawLine(O,X)
\end{tikzpicture}
\end{document}