


(回覆前請先閱讀:)我會的不是將第二張圖片替換為另一個範例圖像,這篇文章的重點是展示我在嘗試使用真實圖像時遇到的問題。
我有以下程式碼,其中的數字降低了以滿足幾何尺寸的上邊距參數,這解決了我大約一周前問的問題(即圖像超出了邊距邊框),但我怎麼能做到這一點像這樣的事情是自動化的,並且是在沒有指定我希望我的身材降低0.02cm的情況下完成的?
% {
\documentclass[letterpaper, 12pt]{article}
\usepackage{graphicx}
\usepackage{newfloat}
\usepackage[showframe, left=1.5cm, right=1.5cm, top=1.5cm, bottom=1.5cm]{geometry}
\usepackage{indentfirst}
\usepackage{fancyhdr}
\pagestyle{fancy}
\fancyhf{} % clear all header and footers
\cfoot{\thepage} % put the page number in the center footer
\renewcommand{\headrulewidth}{0pt} % remove the header rule
\addtolength{\footskip}{-.5cm} % shift the footer down which will shift the page number up
\usepackage[backend=biber]{biblatex}
\usepackage{subcaption}
\usepackage{adjustbox}
\usepackage{microtype}
\usepackage{csquotes}
\usepackage{lipsum}
\usepackage{unicode-math}
\setmainfont{Times New Roman}[Ligatures=TeX]
\setmathfont{STIX Two Math}
\usepackage[main=english,spanish]{babel}
\makeatletter
\renewcommand{\@maketitle}{%
\newpage
\null
\vspace{-0.125cm} % This corresponds to the top margin set by geometry
\begin{center}
\parskip=0pt
\let\footnote\thanks
{\LARGE \@title \par }%
\vspace{0cm} % Adjust this value to control the space between the title and author
{\large \lineskip .5em%
\begin{tabular}[t]{c}%
\@author
\end{tabular}%
\par }%
\vspace{.25cm} % Adjust this value to control the space between the author and date
{\large \@date }%
\end{center}\par
\vspace{.25cm} % Adjust this value to control the space between the date and content after maketitle
}
\makeatother % ask if you want to change the spacing of the 3 top sections
\renewcommand{\arraystretch}{1.5} % this makes tables look better
\setlength\parindent{.5cm}
% }
\title{Title Random}
\author{David Patterson}
\date{\today}
\begin{document}
\noindent
\begin{minipage}{\textwidth}
\maketitle
\end{minipage}
\begin{center}
\begin{large}
\textsc{\RN{1}. Introduction}
\end{large}
\end{center}
\lipsum[1]
\begin{figure}[htb]
\centering
\includegraphics[width=.5\textwidth]{example-image}
\caption*{Fig. 2: A random image.}
\label{example}
\end{figure}
\begin{center}
\begin{large}
\textsc{\RN{2}. Second Part}
\end{large}
\end{center}
\lipsum[2]
\newpage
\begin{figure}[htb]
\centering
\begin{adjustbox}{margin=.02cm}
\includegraphics[width=.4\textwidth]{04_figure.jpg}
\end{adjustbox}
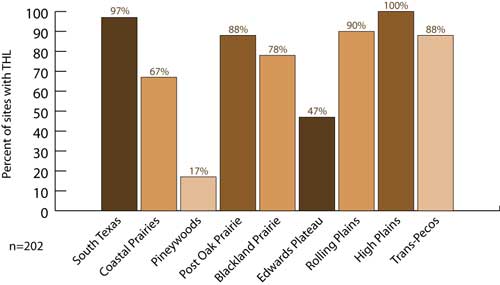
\caption*{Fig. 2: A statistic showing the population of the Texas Horned Lizard, with it having a low distribution percentage in the Pineywoods area.}
\label{Texas Horned Lizard}
\end{figure}
\end{document}

與以下內容相比
% {
\documentclass[letterpaper, 12pt]{article}

\usepackage{graphicx}
\usepackage{newfloat}
\usepackage[showframe, left=1.5cm, right=1.5cm, top=1.5cm, bottom=1.5cm]{geometry}
\usepackage{indentfirst}
\usepackage{fancyhdr}
    \pagestyle{fancy}
    \fancyhf{} % clear all header and footers
    \cfoot{\thepage} % put the page number in the center footer
    \renewcommand{\headrulewidth}{0pt} % remove the header rule
    \addtolength{\footskip}{-.5cm} % shift the footer down which will shift the page number up
\usepackage[backend=biber]{biblatex}
\usepackage{subcaption}
\usepackage{adjustbox}
\usepackage{microtype}
\usepackage{csquotes}
\usepackage{lipsum}
\usepackage{unicode-math}
    \setmainfont{Times New Roman}[Ligatures=TeX]
    \setmathfont{STIX Two Math}
\usepackage[main=english,spanish]{babel}

\makeatletter
\renewcommand{\@maketitle}{%
\newpage
\null
\vspace{-0.125cm} % This corresponds to the top margin set by geometry
\begin{center}
\parskip=0pt
\let\footnote\thanks
{\LARGE \@title \par }%
\vspace{0cm} % Adjust this value to control the space between the title and author
{\large \lineskip .5em%
\begin{tabular}[t]{c}%
\@author
\end{tabular}%
\par }%
\vspace{.25cm} % Adjust this value to control the space between the author and date
{\large \@date }%
\end{center}\par
\vspace{.25cm} % Adjust this value to control the space between the date and content after maketitle
}
\makeatother % ask if you want to change the spacing of the 3 top sections

\renewcommand{\arraystretch}{1.5} % this makes tables look better

\setlength\parindent{.5cm}
% }

\title{Title Random}
\author{David Patterson}
\date{\today}

\begin{document}

\noindent
\begin{minipage}{\textwidth}
\maketitle
\end{minipage}

\begin{center}
\begin{large}
\textsc{\RN{1}. Introduction}
\end{large}
\end{center}

\lipsum[1]

\begin{figure}[htb]
    \centering
    \includegraphics[width=.5\textwidth]{example-image}
    \caption*{Fig. 2: A random image.}
    \label{example}
\end{figure}

\begin{center}
\begin{large}
\textsc{\RN{2}. Second Part}
\end{large}
\end{center}

\lipsum[2]

\newpage

\begin{figure}[htb]
    \centering
    \includegraphics[width=.4\textwidth]{04_figure.jpg}
    \caption*{Fig. 2: A statistic showing the population of the Texas Horned Lizard, with it having a low distribution percentage in the Pineywoods area.}
    \label{Texas Horned Lizard}
\end{figure}


\end{document}
並導致

是否有一個設定adjustbox可以自動執行我需要的操作?我的範例中的圖像是這個
答案1
將範例減少很多之後:
\documentclass{article}

\usepackage{graphicx,xcolor}
\usepackage[showframe, left=1.5cm, right=1.5cm, top=1.5cm, bottom=1.5cm]{geometry}

\begin{document}

\begin{figure}[htb]
    \centering
    \includegraphics[page=1,width=.4\textwidth]{example-image-a4-numbered}
    \caption{Test}
\end{figure}

\end{document}
我發現,那個geometry選項showframe似乎畫了文字區域的頂部框架線裡面文字區域。您也可以使用以下方法:
\documentclass{article}

\usepackage{xcolor}
\usepackage[showframe, left=1.5cm, right=1.5cm, top=1.5cm, bottom=1.5cm]{geometry}

\begin{document}

\noindent{\textcolor{red}{\raisebox{-\dp\strutbox}{\rule{.5\textwidth}{\textheight}}}}

\end{document}
這是左上角放大 5000% 的螢幕截圖:

使用 packageshowframe代替(並將框架移到背景中):
\documentclass{article}

\usepackage{xcolor}
\usepackage[left=1.5cm, right=1.5cm, top=1.5cm, bottom=1.5cm]{geometry}
\usepackage[noframe]{showframe}
\AddToShipoutPictureBG{\ShowFramePicture}

\begin{document}

\noindent{\textcolor{red}{\raisebox{-\dp\strutbox}{\rule{.5\textwidth}{\textheight}}}}

\end{document}
顯示正確的結果:

回到你的問題:通過你的示例,但打包showframe以可視化這些區域,我得到:

所以恕我直言,這沒有任何問題,但德國人說:「Wer viel misst,misst Mist」。 (用英文來說:「如果你測量很多,你測量的就是垃圾。」)。換句話說,圖像正確地放置在文字區域的頂部,因此它遵循 的設置geometry,即使 所顯示的框架geometry另有建議。
順便一提:你的例子可以減少,而不會失去任何東西:
\documentclass{article}

\usepackage{graphicx,xcolor}
\usepackage[showframe, left=1.5cm, right=1.5cm, top=1.5cm, bottom=1.5cm]{geometry}

\begin{document}

\begin{figure}[htb]
    \centering
    \includegraphics[width=.4\textwidth]{04_figure.jpg}
    \caption{Test}
\end{figure}
甚至:
\documentclass{article}

\usepackage{graphicx,xcolor}
\usepackage[showframe, left=1.5cm, right=1.5cm, top=1.5cm, bottom=1.5cm]{geometry}

\begin{document}

\begin{figure}[htb]
    \centering
    \includegraphics[page=1,width=.4\textwidth]{example-image-a4-numbered}
    \caption{Test}
\end{figure}

\end{document}