


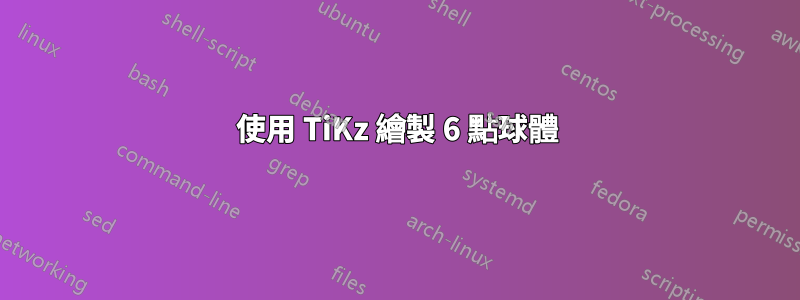
所以我試著使用 TiKz 來獲取圖像,我的想法如下

我缺少的是正確的標籤,主要是希臘字母 eta、xi 和 zeta,我也在尋找指向 0、1 和 $\infty$ 的箭頭,它們似乎在球體的表面上,我想了一下這個,它可能是橢圓的一部分,但很明顯我不知道如何實現它。
這是我到目前為止的程式碼以及渲染的圖像:
\documentclass{standalone}
\usepackage{tikz}
\usetikzlibrary{3d}

\begin{document}
\begin{tikzpicture}[scale=2]
    % Define sphere
    \draw (0,0) circle [radius=1];
    % Draw equator
    \draw[dashed] (90:1) arc (90:270:1);
    % Draw ellipse
    \draw[dashed] (1,0) arc (0:180:1 and 0.3);
    \draw (-1,0) arc (180:360:1 and 0.3);
    % Draw points
    \foreach \angle/\label/\pos in {30/A/above left, 150/B/above left, 90/C/above, -30/X/below left, -150/Y/below left, -90/Z/below} {
        \node (\label) at (\angle:1) [circle, fill, inner sep=0.03cm, label=\pos:\label] {};
    }
    % Draw arrows
    \foreach \from/\to in {A/B, B/C, C/X} {
        \draw[->] (\from) -- (\to);
    }
    % Draw dashed lines for perspective
    \draw[dashed] (1,0) -- (B);
    \draw[dashed] (1,0) -- (C);
\end{tikzpicture}
\end{document}

幾乎只有 C 點位於正確的位置,當我嘗試將 $\infty$ 放入其中時,出現錯誤
Missing \endcsname inserted.
<to be read again>
                   \infty
l.17     }
任何建議或指示將不勝感激。
答案1
這是一種進行手繪的方法,而螢幕複製則以類似的方式進行。一些備註:
- 一般來說,不要一次嘗試太多;循環在這裡很難,因為你嘗試組合不同的東西
- 你沒有使用 3D 庫,所以我放棄了它
- 半徑可以是常數,如果需要更多耐心,
calc可以在這裡引入 - 樣式是你的朋友,也就是讓程式碼更容易掌握
dots這裡只是填充的節點,它們的形狀是圓形- 在橢圓上,我在不同的位置放置了兩個額外的節點
pos,它們的名稱確實相關 - 從語法上講,路徑以 開頭
\,以 結尾;,其間的所有內容都是要執行的操作(因此這些節點不以 開頭\) - 其他點也可以是座標;名字就是我所追求的
- 請參閱極坐標符號,它再次表明了半徑常數所需的一些想法
- 現在放置標籤和繪製彎曲線幾乎是理所當然的事

\documentclass[border=3mm]{standalone}  % adding some border
\usepackage{tikz}
%\usetikzlibrary{3d}                    % it's not used
\usetikzlibrary{arrows.meta}            % for nicer arrow tips

% ~~~ constants ~~~~~~~~~~~~~~~~~~~~~
\newcommand\rd[0]{2}
\newcommand\rdm[0]{(-2,0)}  % can be done better with calc

\begin{document}
\begin{tikzpicture}%[scale=2] % that's not too good to do
    [
        dot/.style={fill=black,circle,inner sep=1pt},
        as/.style={anchor=south},
        ae/.style={anchor=east},
        aw/.style={anchor=west},
        >={Stealth},            % replacing all arrow tips
    ]
    % Define sphere
    \draw (0,0) circle [radius=\rd{}];
    % Draw equator
    \draw[dashed] (90:\rd{}) arc (90:270:\rd{});
    % Draw ellipse + adding some nodes (with names)
    \draw[dashed] (\rd{},0) arc (0:180:\rd{} and 0.3);
    \draw \rdm{} arc (180:360:\rd{} and 0.3)
            node[pos=.55,dot] (Zero) {}
            node[pos=.70,dot] (One) {};

    % ~~~ other points ~~~~~~~~~
    \node[dot] (Inf) at (0,\rd{}) {};
    \node[dot] (Eta) at (130:1.5) {};
    \node[dot] (Ksi) at (220:1.0) {};
    \node[dot] (Zet) at (340:1.6) {};

    % ~~~ putting labels ~~~~~~~
    \node[as] at (Inf) {$\infty$};
    \node[as] at (Zero){$0$};
    \node[as] at (One) {$1$};

    \node[ae] at (Eta) {$\eta$};
    \node[ae] at (Ksi) {$\xi$};
    \node[aw] at (Zet) {$\zeta$};

    % ~~~ arrows: bender was here ~~~~~
    \draw[->] (Zet) -- (One);               % start this way
    \draw[->] (Eta) to[bend left] (Inf);    % refine later
    \draw[->] (Ksi) to[bend right] (Zero);


%    % Draw points
%    \foreach \angle/\label/\pos in {30/A/above left, 150/B/above left, 90/C/above, -30/X/below left, -150/Y/below left, -90/Z/below} {
%        \node (\label) at (\angle:1) [circle, fill, inner sep=0.03cm, label=\pos:\label] {};
%    }
%    % Draw arrows
%    \foreach \from/\to in {A/B, B/C, C/X} {
%        \draw[->] (\from) -- (\to);
%    }
%    % Draw dashed lines for perspective
%    \draw[dashed] (1,0) -- (B);
%    \draw[dashed] (1,0) -- (C);
\end{tikzpicture}
\end{document}