


다음 MWE를 고려하십시오.
\documentclass[a4paper]{scrartcl}
\usepackage{mathtools}
\usepackage{amssymb}
\usepackage[compatibility=false]{caption}
\usepackage[list]{subcaption}
\usepackage{fancyvrb}
\usepackage{tikz}
\usetikzlibrary{patterns, fit, positioning, calc, shapes.arrows}
\usepackage[active, tightpage, floats, displaymath]{preview}
\mathtoolsset{%
mathic=true
}
% Vectors and matrices
\renewcommand*{\vec}[1]{\mathbf{#1}}
\newcommand{\mat}[1]{\mathbf{#1}}
\newcommand{\trans}{\intercal}
% Operators
\DeclareMathOperator{\rank}{rank}
\DeclareMathOperator*{\argmin}{arg\,min}
\DeclareMathOperator*{\argmax}{arg\,max}
\begin{document}
\begin{figure}
\centering
\captionsetup[subfigure]{margin={2.5cm, 0cm}}
\begin{subfigure}[b]{0.60\textwidth}
\centering
\begin{tikzpicture}[>=latex, shorten >=2pt, shorten <=2pt]
\node[draw, rectangle, label=below:the] (the) {\(\mat W\)};
\node[draw, rectangle, right=of the, label=below:cat] (cat) {\(\mat W\)};
\node[draw, rectangle, right=of cat, label=below:sat] (sat) {\(\mat W\)};
\node[draw, rectangle, fit=(the.west) (the.east), pattern=vertical lines, above=of the] (in_the) {};
\node[draw, rectangle, fit=(cat.west) (cat.east), pattern=vertical lines, above=of cat] (in_cat) {};
\node[draw, rectangle, fit=(sat.west) (sat.east), pattern=vertical lines, above=of sat] (in_sat) {};
\node[draw, rectangle, fit={($(cat.west) + (-8pt,0pt)$) ($(cat.east) + (8pt,0pt)$)}, pattern=vertical lines, above=2cm of cat] (in) {};
\node[draw, rectangle, above=of in, label=above:mat] (out) {\(\vec b\), \(\mat U\)};
\node[left=of the, outer sep=0] (embed) {embed};
\node[above=2cm of embed, outer sep=0] (concatenate) {concatenate};
\node[above=1cm of concatenate, outer sep=0] {softmax};
\foreach \word in {the, cat, sat}{%
\draw[->] (\word) -- (in_\word);
\draw[->] (in_\word) -- (in);
}
\draw[->] (in) -- (out);
\end{tikzpicture}
\caption{CBOW model}\label{fig:cbow}
\end{subfigure}
\captionsetup[subfigure]{margin={0cm,0cm}}
\begin{subfigure}[b]{0.35\textwidth}
\centering
\begin{tikzpicture}[>=latex, shorten >=2pt, shorten <=2pt]
\node[draw, rectangle, label=below:cat] (cat) {\(\mat W\)};
\node[draw, rectangle, fit=(cat.west) (cat.east), pattern=vertical lines, above=of cat] (in) {};
\node[draw, rectangle, above=2cmof in, label=above:on] (on) {\(\vec b\), \(\mat U\)};
\node[draw, rectangle, left=of on, label=above:sat] (sat) {\(\vec b\), \(\mat U\)};
\node[draw, rectangle, right=of on, label=above:the] (the) {\(\vec b\), \(\mat U\)};
\draw[->] (cat) -- (in);
\foreach \word in {sat, on, the}{%
\draw[->] (in) -- (\word);
}
\end{tikzpicture}
\caption{Skip\=/gram model}\label{fig:sg}
\end{subfigure}
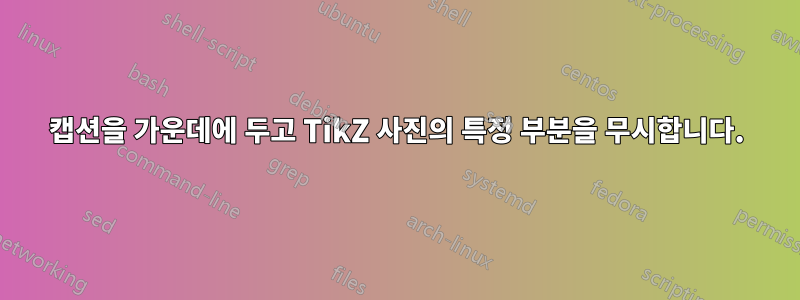
\caption{\protect\Verb+Word2Vec+ with vocabulary size \(V\), context
size \(C\), and embedding size \(N\)}
\end{figure}
\end{document}
%%% Local Variables:
%%% mode: latex
%%% TeX-master: t
%%% End:
다음을 조판합니다.

보시다시피 를 사용하여 "(a) CBOW 모델" 캡션을 "중앙에" 배치했습니다 \captionsetup[subfigure]{margin={2.5cm, 0cm}}. 내 질문은: 이것을 할 필요가 없는 것이 가능합니까? 아니면 적어도 캡션을 오프셋하는 데 필요한 올바른 너비를 어떻게든 계산할 수 있을까요?
답변1
\useasboundingboxTikZ에서 그림의 크기를 설정하는 데 사용할 수 있습니다 . 그러면 TikZ는 사진 크기를 계산하기 위해 해당 명령 이후의 모든 내용을 무시합니다. (current bounding box)지금까지의 사진 크기를 참고할 수 있습니다 . 종이 크기에 포함되어야 하는 모든 것을 그리는 한, 선 앞에 \useasboundingbox (current bounding box)그림은 원하는 크기를 갖게 됩니다.
또한 subfigure왼쪽으로 겹치는 것을 허용하려면 빈 공간이 필요합니다. 그래서 첫 번째가 되어야 합니다. 물론 왼쪽(지금은 가운데) 하위 그림의 너비를 조정해야 합니다.
\documentclass[a4paper]{scrartcl}

\usepackage{mathtools}
\usepackage{amssymb}

\usepackage[compatibility=false]{caption}
\usepackage[list]{subcaption}

\usepackage{fancyvrb}

\usepackage{tikz}
\usetikzlibrary{patterns, fit, positioning, calc, shapes.arrows}

\usepackage[active, tightpage, floats, displaymath]{preview}

\mathtoolsset{%
  mathic=true
}

% Vectors and matrices
\renewcommand*{\vec}[1]{\mathbf{#1}}
\newcommand{\mat}[1]{\mathbf{#1}}
\newcommand{\trans}{\intercal}

% Operators
\DeclareMathOperator{\rank}{rank}
\DeclareMathOperator*{\argmin}{arg\,min}
\DeclareMathOperator*{\argmax}{arg\,max}

\begin{document}
\begin{figure}
  \centering
% no longer needed
%  \captionsetup[subfigure]{margin={2.5cm, 0cm}}
  %empty subfugure to allow for overlap to the left
  \begin{subfigure}[b]{0.15\textwidth}
  \mbox{}
  \end{subfigure}
  \begin{subfigure}[b]{0.40\textwidth}
    \centering
    \begin{tikzpicture}[>=latex, shorten >=2pt, shorten <=2pt]
      \node[draw, rectangle, label=below:the] (the) {\(\mat W\)};
      \node[draw, rectangle, right=of the, label=below:cat] (cat) {\(\mat W\)};
      \node[draw, rectangle, right=of cat, label=below:sat] (sat) {\(\mat W\)};

      \node[draw, rectangle, fit=(the.west) (the.east), pattern=vertical lines, above=of the] (in_the) {};
      \node[draw, rectangle, fit=(cat.west) (cat.east), pattern=vertical lines, above=of cat] (in_cat) {};
      \node[draw, rectangle, fit=(sat.west) (sat.east), pattern=vertical lines, above=of sat] (in_sat) {};

      \node[draw, rectangle, fit={($(cat.west) + (-8pt,0pt)$) ($(cat.east) + (8pt,0pt)$)}, pattern=vertical lines, above=2cm of cat] (in) {};
      \node[draw, rectangle, above=of in, label=above:mat] (out) {\(\vec b\), \(\mat U\)};

      % set the picture size to everything drawn so far
      \useasboundingbox (current bounding box);

      % not taken into account for the picture size
      \node[left=of the, outer sep=0] (embed) {embed};
      \node[above=2cm of embed, outer sep=0] (concatenate) {concatenate};
      \node[above=1cm of concatenate, outer sep=0] {softmax};

      % this belongs to the main part, but it doesn't increase its size
      % otherwise it must be moved before \useasboundingbox
      \foreach \word in {the, cat, sat}{%
        \draw[->] (\word) -- (in_\word);
        \draw[->] (in_\word) -- (in);
      }

      \draw[->] (in) -- (out);
    \end{tikzpicture}
    \caption{CBOW model}\label{fig:cbow}
  \end{subfigure}
% no longer needed
%  \captionsetup[subfigure]{margin={0cm,0cm}}
  \begin{subfigure}[b]{0.35\textwidth}
    \centering
    \begin{tikzpicture}[>=latex, shorten >=2pt, shorten <=2pt]
      \node[draw, rectangle, label=below:cat] (cat) {\(\mat W\)};
      \node[draw, rectangle, fit=(cat.west) (cat.east), pattern=vertical lines, above=of cat] (in) {};
      \node[draw, rectangle, above=2cmof in, label=above:on] (on) {\(\vec b\), \(\mat U\)};
      \node[draw, rectangle, left=of on, label=above:sat] (sat) {\(\vec b\), \(\mat U\)};
      \node[draw, rectangle, right=of on, label=above:the] (the) {\(\vec b\), \(\mat U\)};

      \draw[->] (cat) -- (in);
      \foreach \word in {sat, on, the}{%
        \draw[->] (in) -- (\word);
      }
    \end{tikzpicture}
    \caption{Skip\=/gram model}\label{fig:sg}
  \end{subfigure}
  \caption{\protect\Verb+Word2Vec+ with vocabulary size \(V\), context
    size \(C\), and embedding size \(N\)}
\end{figure}
\end{document}
답변2
이것은 원래의 (상대적으로) 간단한 답변보다 (상대적으로) 덜 간단한 방법입니다. 이 방법은 좀 더 유연하고 약간 더 잘 테스트되었습니다. etoolbox과 가 필요합니다 xparse. (원하는 경우 후자를 쉽게 생략할 수 있지만 편리합니다.)
설정을 완료하면 모든
tikzpicture환경이 수정됩니다.\tikz필요한 경우 매크로를 포함하도록 확장될 수 있습니다 .글로벌 영향이 바람직하지 않은 경우 정의를 제거 하고 에 대한 선택적 인수에
every picture간단히 사용하십시오 .mark outtikzpicture
왼쪽, 오른쪽, 둘 다 또는 둘 다 모두 재료를 조정할 수 있습니다.
MWE를 기반으로 한 간단한 사례의 유일한 요구 사항은 캡션을 배치하는 데 사용해야 하는 \tikzmarkerwest그림 부분의 왼쪽을 표시하려는 그림 지점에 삽입하는 것입니다. \caption그림에서 매크로를 전혀 사용하지 않으면 그림이 완성될 때 코드가 그림의 경계 상자 왼쪽으로 돌아갑니다. 이는 subfigure예제의 두 번째에서 발생합니다 .
첫 번째 코드 subfigure는 재정렬되어 \caption무시해야 하는 모든 항목이 그림의 첫 번째 부분 뒤에 옵니다. \tikzmarkerwest그런 다음 이 지점에서 왼쪽을 표시하기 위해 삽입됩니다.
...
      \foreach \word in {the, cat, sat}{%
        \draw[->] (\word) -- (in_\word);
        \draw[->] (in_\word) -- (in);
      }
      \draw[->] (in) -- (out);
이것이 우리가 \caption배치에 사용하려는 모든 것이므로 이제 그림의 왼쪽을 표시하십시오.
\tikzmarkerwest
이제 우리는 그 지점의 왼쪽에 물건을 놓았습니다. 이는 \caption무시되어야 합니다.
      \node[left=of the, outer sep=0] (embed) {embed};
      \node[above=2cm of embed, outer sep=0] (concatenate) {concatenate};
      \node[above=1cm of concatenate, outer sep=0] {softmax};
이제 그림을 완성하고 평소와 같이 캡션과 레이블을 추가합니다.
    \end{tikzpicture}
    \caption{CBOW model}\label{fig:cbow}

오른쪽 자료 \tikzmarkereast의 경우, 또는 대신에 를 사용할 수 있습니다 \tikzmarkerwest.
이런 식으로 그림 속 코드를 재배치하는 것이 불편하거나 불가능한 경우도 있습니다. 필요한 순서대로 쉽게 그릴 수는 없습니다. 이러한 이유로 \tikzmarkereast및 \tikzmarkerwest선택적 인수를 지원합니다. 지정된 경우 일반적으로 좌표와 마찬가지로 둥근 괄호 안에 좌표를 입력해야 합니다. 이 경우 캡션을 배치할 때 지정된 좌표의 오른쪽이나 왼쪽에 있는 모든 항목이 무시됩니다.
이를 지원하는 코드는 \tikzmarkerwest다음과 같이 매크로를 정의합니다.
\NewDocumentCommand \tikzmarkerwest { D () {current bounding box.west} } {%
  \coordinate (tikz marker west) at (#1);
  \let\tikzmarkerwestdefault\relax
}
(tikz marker west)그러면 적절한 위치에 좌표가 생성됩니다 . 그런 다음 아무 것도 성공적으로 수행되지 않는지 확인합니다 \tikzmarkerwestdefault.
\tikzmarkereast같은 방식으로 정의됩니다.
\NewDocumentCommand \tikzmarkereast { D () {current bounding box.east} } {%
  \coordinate (tikz marker east) at (#1);
  \let\tikzmarkereastdefault\relax
}
우리는 확인 \tikzmarkerwestdefault하고 \tikzmarkereast정의합니다. 기본적으로는 아무 작업도 수행하지 않습니다.
\NewDocumentCommand \tikzmarkerwestdefault {} {}
\NewDocumentCommand \tikzmarkereastdefault {} {}
이제 Ti를 위해케이Z 코드.
\tikzset{%
스타일은 mark out환경에 대한 선택적 인수에 제공된 경우 현재 그림의 시작과 끝에서 실행될 코드를 추가하거나 아래와 같이 구성된 경우 모든 그림의 시작과 끝에서 실행될 코드를 추가합니다.
  mark out/.style={%
    execute at begin picture={%
      \RenewDocumentCommand \tikzmarkerwestdefault {}
      {%
        \coordinate (tikz marker west) at (current bounding box.west);
      }%
      \RenewDocumentCommand \tikzmarkereastdefault {}
      {%
        \coordinate (tikz marker east) at (current bounding box.east);
      }%
    },
이는 현재 경계 상자의 왼쪽과 오른쪽에 좌표 를 생성하기 위해 \tikzmarkerwestdefault및 매크로를 재정의합니다. 이는 단지 정의일 뿐이며 기본 빈 정의를 재정의합니다. 실제로 아직 좌표를 생성하지 않습니다.\tikzmarkereastdefault(tikz marker west)(tikz marker east)
    execute at end picture={%
      \tikzmarkerwestdefault
      \tikzmarkereastdefault
그림의 끝에서 를 실행합니다 \tikzmarkerwestdefault. \tikzmarkerwest그림 내에서 호출된 경우 아무 작업도 성공적으로 수행되지 않습니다. 그렇지 않으면 그림의 최종 경계 상자인 현재 경계 상자 왼쪽에 마커가 생성됩니다. .\tikzmarkereastdefault
\path let \p1=(tikz marker west), \p2=(current bounding box.west), \n1={\x1-\x2} in \pgfextra{\xdef\myadjustwest{\n1}} ;
x이는 좌표 부분 (tikz marker west)과 x현재 경계 상자 왼쪽에 있는 좌표 부분 간의 차이를 계산합니다 . 일반적으로 이는 0pt입니다. 그러나 \tikzmarkerwest호출된 경우 현재 경계 상자 왼쪽에서 마커 노드까지의 거리는 0이 아닐 수 있습니다. (실제로 매크로가 호출된 경우 이것이 매크로를 사용하는 유일한 이유이므로 아마도 그럴 것입니다.)
(tikz marker east)이제 현재 경계 상자와 오른쪽에 대해 동일한 작업을 수행합니다 .
      \path let \p1=(tikz marker east), \p2=(current bounding box.east), \n1={\x2-\x1} in \pgfextra{\xdef\myadjusteast{\n1}} ;
    },
  },


  every picture/.style={mark out},
이 줄은 mark out모든 Ti에 스타일을 적용합니다.케이Z 사진. 이로 인해 문제가 발생하면 제거하고 mark out원하는 사진에 추가하세요.
}
\newlength\myadjustwest
\newlength\myadjusteast
반드시 확인 \myadjustwest하고 \myadjusteast관계없이 이용 가능합니다.
\AfterEndEnvironment{tikzpicture}{%
  \captionsetup{margin={\myadjustwest,\myadjusteast}}%
}{\typeout{OK!}}{\typeout{Oh, no!}}
이는 모든 환경의 끝을 올바르게 tikzpicture수정하도록 조정합니다 \caption. 이것을 사용하는 경우 OK!및 대신 의미 있는 메시지를 대체해야 합니다 .Oh, no!
다음 예제 세트는 기본적인 가능성을 보여줍니다. 예를 들어 음영 처리된 직사각형을 기준으로 캡션을 배치하려는 경우 캡션의 일부, 다른 부분, 또 다른 부분을 (아주 쉽게) 음영 처리하여 단계 사이에 경계 상자를 적절하게 표시할 수 없습니다. 따라서 이 경우 \tikzmarkerwest및/또는 에 대한 선택적 인수를 사용하여 \tikzmarkereast가시 광선 스펙트럼의 빨간색 끝, 파란색 끝 및 중앙 왼쪽 중간 비트에 초점을 맞춘 캡션 위치를 가져옵니다.
빨간색의 경우 ...
...
      \shade [shading=wave, shading angle=90] (0,0) rectangle ++(\linewidth,1) coordinate [pos=.4] (r);
      \tikzmarkereast(r)
...
블루스를 위해 ...
...
      \shade [shading=wave, shading angle=90] (0,0) rectangle ++(\linewidth,1) coordinate [pos=.6] (b);
      \tikzmarkerwest(b)
...
내장을 위해 ...
...
      \shade [shading=wave, shading angle=90] (0,0) rectangle ++(\linewidth,1) coordinate [pos=.1] (a) coordinate [pos=.5] (b);
      \tikzmarkereast(b)
      \tikzmarkerwest(a)
...

전체 코드:
% arara: pdflatex
\pdfminorversion=7
% ateb: https://tex.stackexchange.com/a/377652/ addaswyd o gwestiwn d125q: https://tex.stackexchange.com/q/377476/
\documentclass[a4paper]{scrartcl}
\usepackage{mathtools,amssymb}
\usepackage[compatibility=false]{caption}
\usepackage[list]{subcaption}
\usepackage{fancyvrb,tikz,etoolbox,xparse}
\usetikzlibrary{patterns, fit, positioning, calc}
\usepackage[active, tightpage, floats, displaymath]{preview}
\mathtoolsset{%
  mathic=true
}
\NewDocumentCommand \tikzmarkerwest { D () {current bounding box.west} } {%
  \coordinate (tikz marker west) at (#1);
  \let\tikzmarkerwestdefault\relax
}
\NewDocumentCommand \tikzmarkerwestdefault {} {}
\NewDocumentCommand \tikzmarkereast { D () {current bounding box.east} } {%
  \coordinate (tikz marker east) at (#1);
  \let\tikzmarkereastdefault\relax
}
\NewDocumentCommand \tikzmarkereastdefault {} {}
\tikzset{%
  mark out/.style={%
    execute at begin picture={%
      \RenewDocumentCommand \tikzmarkerwestdefault {}
      {%
        \coordinate (tikz marker west) at (current bounding box.west);
      }%
      \RenewDocumentCommand \tikzmarkereastdefault {}
      {%
        \coordinate (tikz marker east) at (current bounding box.east);
      }%
    },
    execute at end picture={%
      \tikzmarkerwestdefault
      \tikzmarkereastdefault
      \path let \p1=(tikz marker west), \p2=(current bounding box.west), \n1={\x1-\x2} in \pgfextra{\xdef\myadjustwest{\n1}} ;
      \path let \p1=(tikz marker east), \p2=(current bounding box.east), \n1={\x2-\x1} in \pgfextra{\xdef\myadjusteast{\n1}} ;
    },
  },
  every picture/.style={mark out},
}
\newlength\myadjustwest
\newlength\myadjusteast
\AfterEndEnvironment{tikzpicture}{%
  \captionsetup{margin={\myadjustwest,\myadjusteast}}%
}{\typeout{OK!}}{\typeout{Oh, no!}}

% for the examples
\definecolor{wave start}{wave}{380}
\definecolor{wave violet}{wave}{400}
\definecolor{wave indigo}{wave}{445}
\definecolor{wave blue}{wave}{475}
\definecolor{wave green}{wave}{510}
\definecolor{wave yellow}{wave}{570}
\definecolor{wave orange}{wave}{590}
\definecolor{wave red}{wave}{650}
\definecolor{wave end}{wave}{780}
\pgfdeclareverticalshading{wave}{100bp}{% manual 1088; xcolor manual; does not work to use wave model directly (?); https://science-edu.larc.nasa.gov/EDDOCS/Wavelengths_for_Colors.html
  color(0bp)=(wave start);
  color(25bp)=(wave start);
  color(27bp)=(wave violet);% 400 nm
  color(33bp)=(wave indigo);% 445nm
  color(37bp)=(wave blue);% 475nm
  color(41bp)=(wave green);% 510nm
  color(49bp)=(wave yellow);% 570nm
  color(51bp)=(wave orange);% 590nm
  color(59bp)=(wave red);% 650nm
  color(75bp)=(wave end);% 780nm
  color(100bp)=(wave end)
}
\begin{document}
\begin{figure}
  \centering
  \begin{subfigure}[b]{0.60\textwidth}
    \centering
    \begin{tikzpicture}[>=latex, shorten >=2pt, shorten <=2pt]
      \node[draw, label=below:the] (the) {\(\mathbf{W}\)};
      \node[draw, right=of the, label=below:cat] (cat) {\(\mathbf{W}\)};
      \node[draw, right=of cat, label=below:sat] (sat) {\(\mathbf{W}\)};
      \node[draw, fit=(the.west) (the.east), pattern=vertical lines, above=of the] (in_the) {};
      \node[draw, fit=(cat.west) (cat.east), pattern=vertical lines, above=of cat] (in_cat) {};
      \node[draw, fit=(sat.west) (sat.east), pattern=vertical lines, above=of sat] (in_sat) {};
      \node[draw, fit={($(cat.west) + (-8pt,0pt)$) ($(cat.east) + (8pt,0pt)$)}, pattern=vertical lines, above=2cm of cat] (in) {};
      \node[draw, above=of in, label=above:mat] (out) {\(\mathbf{b}\), \(\mathbf{U}\)};
      \foreach \word in {the, cat, sat}{%
        \draw[->] (\word) -- (in_\word);
        \draw[->] (in_\word) -- (in);
      }
      \draw[->] (in) -- (out);
      \tikzmarkerwest
      \node[left=of the, outer sep=0] (embed) {embed};
      \node[above=2cm of embed, outer sep=0] (concatenate) {concatenate};
      \node[above=1cm of concatenate, outer sep=0] {softmax};
    \end{tikzpicture}
    \caption{CBOW model}\label{fig:cbow}
  \end{subfigure}
  \begin{subfigure}[b]{0.35\textwidth}
    \centering
    \begin{tikzpicture}[>=latex, shorten >=2pt, shorten <=2pt]
      \node[draw, label=below:cat] (cat) {\(\mathbf{W}\)};
      \node[draw, fit=(cat.west) (cat.east), pattern=vertical lines, above=of cat] (in) {};
      \node[draw, above=2cmof in, label=above:on] (on) {\(\mathbf{b}\), \(\mathbf{U}\)};
      \node[draw, left=of on, label=above:sat] (sat) {\(\mathbf{b}\), \(\mathbf{U}\)};
      \node[draw, right=of on, label=above:the] (the) {\(\mathbf{b}\), \(\mathbf{U}\)};
      \draw[->] (cat) -- (in);
      \foreach \word in {sat, on, the}{%
        \draw[->] (in) -- (\word);
      }
    \end{tikzpicture}
    \caption{Skip\=/gram model}\label{fig:sg}
  \end{subfigure}
  \caption{\protect\Verb+Word2Vec+ with vocabulary size \(V\), context size \(C\), and embedding size \(N\)}
\end{figure}

\begin{figure}
  \centering
  \begin{subfigure}{.33\linewidth}
    \centering
    \begin{tikzpicture}
      \shade [shading=wave, shading angle=90] (0,0) rectangle ++(\linewidth,1) coordinate [pos=.4] (r);
      \tikzmarkereast(r)
    \end{tikzpicture}
    \caption{Reds.}
  \end{subfigure}\hfill
  \begin{subfigure}{.33\linewidth}
    \centering
    \begin{tikzpicture}
      \shade [shading=wave, shading angle=90] (0,0) rectangle ++(\linewidth,1) coordinate [pos=.6] (b);
      \tikzmarkerwest(b)
    \end{tikzpicture}
    \caption{Blues.}
  \end{subfigure}\hfill
  \begin{subfigure}{.33\linewidth}
    \centering
    \begin{tikzpicture}
      \shade [shading=wave, shading angle=90] (0,0) rectangle ++(\linewidth,1) coordinate [pos=.1] (a) coordinate [pos=.5] (b);
      \tikzmarkereast(b)
      \tikzmarkerwest(a)
    \end{tikzpicture}
    \caption{Innards.}
  \end{subfigure}\par
  \caption{Main figure}
\end{figure}
\end{document}
답변3
첫째, 첫 번째 답변은 있는 그대로 일부 사람들에게 유용할 수 있으므로 편집하지 않았습니다.
이 새로운 답변은 캡션의 여백을 계산합니다. 이를 위해 서문에 몇 가지 매크로가 있습니다. 그런 다음 세 가지 명령을 배치해야 합니다. 그들은 모두 논쟁의 여지가 없습니다.
그림에서 주요 부분(즉, 캡션이 중앙에 위치해야 하는 부분)을 먼저 그려야 합니다. 그런 다음 \pgfremembermainx삽입해야합니다. 지금까지 가장 바깥쪽 x 위치를 기억하도록 좌표를 설정했습니다. 그런 다음 주요 부분과 겹치는 부분을 왼쪽과 오른쪽으로 그려야 합니다.
맨 끝, 바로 앞에 \end{tikzpicture}명령을 \pgfgetoverlap배치해야 합니다. 이는 양쪽에 대한 겹침(주요 부분을 기준으로)을 계산하고 이를 치수 레지스터 \overlapleft및 에 저장합니다 \overlapright. 둘 다 전역으로 설정되어 있으므로 tikzpicture. 참고: 이후에 그려진 모든 내용은 \pgfgetoverlap겹침 계산 시 고려되지 않습니다.
그리고 마지막으로 tikzpicture와 캡션 사이의 여백은 으로 설정됩니다 \captionsetmargins. 환경에 있기 때문에 그 효과는 지역적입니다 subfigure. 여기서는 선택적 인수( )를 사용할 수 없으므로 모든 캡션에 대한 여백을 설정하므로 환경 외부에서 사용하면 안 됩니다 [subfigure]. 물론 이것은 사진 이후에만 작동합니다. 왜냐하면 겹침이 사진 이전에는 알려지지 않았기 때문입니다.
\documentclass[a4paper]{scrartcl}

\usepackage{mathtools}
\usepackage{amssymb}

\usepackage[compatibility=false]{caption}
\usepackage[list]{subcaption}

\usepackage{fancyvrb}

\usepackage{tikz}
\usetikzlibrary{patterns, fit, positioning, calc, shapes.arrows}

\usepackage[active, tightpage, floats, displaymath]{preview}

\mathtoolsset{%
  mathic=true
}

% Vectors and matrices
\renewcommand*{\vec}[1]{\mathbf{#1}}
\newcommand{\mat}[1]{\mathbf{#1}}
\newcommand{\trans}{\intercal}

% Operators
\DeclareMathOperator{\rank}{rank}
\DeclareMathOperator*{\argmin}{arg\,min}
\DeclareMathOperator*{\argmax}{arg\,max}

%---------------------------------------------------------------------
% code for automatic setting of caption margins
\makeatletter
\newdimen\overlapleft
\newdimen\overlapright

\newcommand{\pgfremembermainx}{%
    \coordinate (main west) at (current bounding box.west);
    \coordinate (main east) at (current bounding box.east);
}
\newcommand{\pgfgetoverlap}{%
    \pgfextractx{\@tempdima}{%
        \pgfpointdiff{\pgfpointanchor{current bounding box}{west}}%
                     {\pgfpointanchor{main west}{center}}%
    }%
    \global\overlapleft=\@tempdima
    \pgfextractx{\@tempdima}{%
        \pgfpointdiff{\pgfpointanchor{main east}{center}}%
                     {\pgfpointanchor{current bounding box}{east}}%
    }%
    \global\overlapright=\@tempdima
}
\newcommand{\captionsetmargins}{%
    % no additional calculation required here
    \captionsetup{margin={\overlapleft,\overlapright}}%
}
\makeatother
%---------------------------------------------------------------------

\begin{document}
\begin{figure}
  \centering
% not needed here
%  \captionsetup[subfigure]{margin={2.5cm, 0cm}}
  \begin{subfigure}[b]{0.60\textwidth}
    \centering
    \begin{tikzpicture}[>=latex, shorten >=2pt, shorten <=2pt]
      \node[draw, rectangle, label=below:the] (the) {\(\mat W\)};
      \node[draw, rectangle, right=of the, label=below:cat] (cat) {\(\mat W\)};
      \node[draw, rectangle, right=of cat, label=below:sat] (sat) {\(\mat W\)};

      \node[draw, rectangle, fit=(the.west) (the.east), pattern=vertical lines, above=of the] (in_the) {};
      \node[draw, rectangle, fit=(cat.west) (cat.east), pattern=vertical lines, above=of cat] (in_cat) {};
      \node[draw, rectangle, fit=(sat.west) (sat.east), pattern=vertical lines, above=of sat] (in_sat) {};

      \node[draw, rectangle, fit={($(cat.west) + (-8pt,0pt)$) ($(cat.east) + (8pt,0pt)$)}, pattern=vertical lines, above=2cm of cat] (in) {};
      \node[draw, rectangle, above=of in, label=above:mat] (out) {\(\vec b\), \(\mat U\)};

      % remember the x-coordinates of the main part
      \pgfremembermainx
      % \useasboundingbox was here in the first answer

      % not taken into account for the picture size
      \node[left=of the, outer sep=0] (embed) {embed};
      \node[above=2cm of embed, outer sep=0] (concatenate) {concatenate};
      \node[above=1cm of concatenate, outer sep=0] {softmax};

      % this belongs to the main part, but it doesn't increase its size
      % otherwise it must be moved before \pgfremembermainx
      \foreach \word in {the, cat, sat}{%
        \draw[->] (\word) -- (in_\word);
        \draw[->] (in_\word) -- (in);
      }

      \draw[->] (in) -- (out);

      %for testing, if it also works with overlap to the right
      %\node[draw, right= of sat] {t};

      % must be right before \end{tikzpicture}, everything after it
      % would not be taken into account for the calculation of the overlap
      \pgfgetoverlap
    \end{tikzpicture}
    % setting the caption margins
    % moving this here sets the margin locally (only for the current environment)
    % and here the computed values for the margins are known
    \captionsetmargins
    \caption{CBOW model}\label{fig:cbow}
  \end{subfigure}
% no longer needed
%  \captionsetup[subfigure]{margin={0cm,0cm}}
  \begin{subfigure}[b]{0.35\textwidth}
    \centering
    \begin{tikzpicture}[>=latex, shorten >=2pt, shorten <=2pt]
      \node[draw, rectangle, label=below:cat] (cat) {\(\mat W\)};
      \node[draw, rectangle, fit=(cat.west) (cat.east), pattern=vertical lines, above=of cat] (in) {};
      \node[draw, rectangle, above=2cmof in, label=above:on] (on) {\(\vec b\), \(\mat U\)};
      \node[draw, rectangle, left=of on, label=above:sat] (sat) {\(\vec b\), \(\mat U\)};
      \node[draw, rectangle, right=of on, label=above:the] (the) {\(\vec b\), \(\mat U\)};

      \draw[->] (cat) -- (in);
      \foreach \word in {sat, on, the}{%
        \draw[->] (in) -- (\word);
      }
    \end{tikzpicture}
    \caption{Skip\=/gram model}\label{fig:sg}
  \end{subfigure}
  \caption{\protect\Verb+Word2Vec+ with vocabulary size \(V\), context
    size \(C\), and embedding size \(N\)}
\end{figure}
\end{document}