


我正在把我放在一起的程式碼使用TikZ,是否可以水平和垂直分割節點?,並將其製作成圖片。這是可行的,但要連續放置圖片s 有問題:圖片s,即使命名不能互相引用,儘管可以引用圖片中的命名節點。
如果每個人的高度圖片測量後,可以使用圖片高度的一半來調整圖片的位置(在可選參數中\step(請參閱範例程式碼)。
我很難理解如何透過最少的手動幹預來實現這一點。答案位於錨定 TiKZ 圖片似乎表明,在某些情況下,這是可能的,但到目前為止我還沒有找到使用它們的方法...
\documentclass{article}

\usepackage{fontspec,tikz}

\usetikzlibrary{calc,positioning,shapes.multipart,fit,backgrounds}

\newcounter{stepnum}
\newcounter{tmpnum}
\newlength{\recwd}

\setlength{\recwd}{2.5in}

%% |=====8><-----| %%

\makeatletter
  \newcommand{\dist}[3]{% #1 cs for result; #2 tikz coord. 1; #3 tikz coord. -- uses calc
  \tikz@scan@one@point\pgfutil@firstofone($(#2)-(#3)$)\relax
  \pgfmathsetlengthmacro{#1}{veclen(\the\pgf@x,\the\pgf@y)}% <<<--->>>
  }%
\makeatother

\tikzset{pics/hvmpnode/.style n args={3}{% The basic mechanism: #1=L; #2=UR; #3=LR
    code={%
        \node[name=L\thestepnum,rounded corners=1.5pt,fill=cyan!20] {% Left
            \hbox to 1.25em{\hss\textbf{#1}\hss}
        };
        \node[rounded corners,
            rectangle split,
            rectangle split parts=2,
            rectangle split part fill={yellow!80!orange!20,none},
            align=center,
            rounded corners=1.5pt,
            name=R,
            right= 0pt of L\thestepnum.east] {%
                \nodepart{one}\parbox{\recwd}{\centering\strut#2\strut}% UR
                \nodepart{two}\parbox{\recwd}{\parskip1ex\strut#3\strut}
            };% LR
        \draw[thick]  (R.text split east) -- (R.text split west);
        \node[inner sep=0pt,
            draw,
            thick,
            rounded corners=1.5pt,
            name=W\thestepnum,
            anchor=south west,
            fit=(L\thestepnum)(R)] {};% W = enclosing box
        \draw[thick] (W\thestepnum.south west -| R.west) --
            (W\thestepnum.north west -| R.west);% L/R rule
        \begin{scope}[on background layer]
            \fill[cyan!20,rounded corners=1.5pt] (W\thestepnum.north west) rectangle (R.south west);
        \end{scope}
        }%
    }
}

\NewDocumentEnvironment{example}{s O{} m o}{%
    \setcounter{stepnum}{0}%
    \parbox{\textwidth}{%
        \begingroup
            \bfseries
            \itshape
            \Large
            #3
            \par
        \endgroup
        \IfNoValueF{#4}{%
            \par\small\itshape\rightskip=0.5\textwidth plus 3em#4\par
        }%
    }%
    \par
    \medskip
    \begin{tikzpicture}[]
}{%
    \end{tikzpicture}
    \bigskip
}

\NewDocumentCommand{\step}{O{24pt} m +m}{% #1=materials; #2=technique
    \stepcounter{stepnum}%
    \setcounter{tmpnum}{\numexpr\thestepnum-1\relax}
    \ifnum\thestepnum=1
        \path (0,0) pic{hvmpnode={\thestepnum}{#2}{#3}};
    \else
        \path ([yshift=-#1]0,0 |- W\thetmpnum.south west)%% manually setting yshift as optional argument to \step is possible but icky; this aligns but is suspicious
            pic{hvmpnode={\thestepnum}{#2}{#3}};%% faulty
    \fi
    \dist{\mydist}{W\thestepnum.north}{W\thestepnum.south}\typeout{!!mydist=\mydist!!}
}

%% |=====8><-----| %%

\parindent0pt

\begin{document}

\thispagestyle{empty}

\begin{example}{Foobar}[This is a meaningless bunch of bla bla bla to see if this works in any way, shape, or form.]
\step{1 2 3 4 5 6}{bla bla bla lkfjdlkj}
\step[49.66pt]{z b c d e f 7 8 9}{Much more bla bla bla and this is so much more jejune nonsense and a lot more bubbishy stuff that makes no sense. Much more bla bla bla and this is so much more jejune nonsense and a lot more bubbishy stuff that makes no sense.}
\step[49.66pt]{z b c d e f 7 8 9}{Much more bla bla bla, Much more bla bla bla and this is so much more jejune nonsense and a lot more bubbishy stuff that makes no sense. Much more bla bla bla and this is so much more jejune nonsense an}
\step[19.66pt]{z b c d e f 7 8 9}{Much more bla bla bla}
\end{example}

For the height of each \texttt{pic}, \texttt{\string\typeout} says:

\begin{tabular}{l}
!!mydist=39.33188pt!!\\
!!mydist=99.33188pt!!\\
!!mydist=99.33188pt!!\\
!!mydist=39.33188pt!!
\end{tabular}

\end{document}

答案1
這是使用開始的想法的答案錨定 TiKZ 圖片。這是不可避免的,在找出這個答案時,我發現了必要程式碼的一部分中的一個錯誤,我已在 tikzmark 的版本中修復了該錯誤github(發布日期為 2023 年 12 月,如果在該日期後幾個月閱讀本文,那麼幾乎可以肯定它現在已經在 CTAN 上更新)。
該鍵surround pic在圖片周圍放置一個與圖片同名的矩形節點,以便(<pic name>.south)在定義圖片後可以用它來定義座標,例如 。
然後,金鑰pic anchor會安裝移動圖片的程式碼,使其「錨點」位於指定位置。使用定位庫,這意味著below=0pt of <previous pic>可以使用類似的東西來指定圖片的位置。
最後,在弄清楚當前程式碼的作用時,我做了一些修飾性的更改,主要是為了 TikZ 化已經存在的內容,例如使用按鍵將數字加粗並居中,而不是對其進行硬編碼。
\documentclass{article}
%\url{https://tex.stackexchange.com/q/705474/86}
\usepackage{fontspec,tikz}

\usetikzlibrary{
  calc,
  positioning,
  shapes.multipart,
  fit,
  backgrounds,
  tikzmark
}

\newcounter{stepnum}
\newcounter{tmpnum}
\newlength{\recwd}

\setlength{\recwd}{2.5in}

%% |=====8><-----| %%

\tikzset{
  pics/hvmpnode/.style n args={3}{% The basic mechanism: #1=L; #2=UR; #3=LR
    code={%
      \node[
        name=L\thestepnum,
        rounded corners=1.5pt,
        fill=cyan!20,
        text width=1.25em,
        node font=\bfseries,
        align=center,
        node contents={#1}
      ];
      \node[rounded corners,
        rectangle split,
        rectangle split parts=2,
        rectangle split part fill={yellow!80!orange!20,none},
        align=center,
        rounded corners=1.5pt,
        name=R,
        right= 0pt of L\thestepnum.east] {%
        \nodepart{one}\parbox{\recwd}{\centering\strut#2\strut}% UR
        \nodepart{two}\parbox{\recwd}{\parskip1ex\strut#3\strut}
      };% LR
      \draw[thick]  (R.text split east) -- (R.text split west);
      \node[inner sep=0pt,
        draw,
        thick,
        rounded corners=1.5pt,
        name=W\thestepnum,
        anchor=south west,
        fit=(L\thestepnum)(R)] {};% W = enclosing box
      \draw[thick] (W\thestepnum.south west -| R.west) --
      (W\thestepnum.north west -| R.west);% L/R rule
      \begin{scope}[on background layer]
      \fill[cyan!20,rounded corners=1.5pt] (W\thestepnum.north west) rectangle (R.south west);
      \end{scope}
    }%
  }
}

\NewDocumentEnvironment{example}{s O{} m o}{%
  \setcounter{stepnum}{0}%
  \parbox{\textwidth}{%
    \begingroup
    \bfseries
    \itshape
    \Large
    #3
    \par
    \endgroup
    \IfNoValueF{#4}{%
      \par\small\itshape\rightskip=0.5\textwidth plus 3em#4\par
    }%
  }%
  \par
  \medskip
  \begin{tikzpicture}[]
}{%
  \end{tikzpicture}
  \bigskip
}

\tikzset{
  if number/.code n args={3}{
    \ifnum#1\relax
    \pgfkeysalso{#2}
    \else
    \pgfkeysalso{#3}
    \fi
  }
}

\NewDocumentCommand{\step}{O{24pt} m +m}{% #1=materials; #2=technique
  \stepcounter{stepnum}%
  \setcounter{tmpnum}{\numexpr\thestepnum-1\relax}
  \pic[
    name=hvmp\thestepnum,
    surround pic,
    if number={\thestepnum=1}{}{
      pic anchor,
      below=0pt of hvmp\thetmpnum,
    }
  ] {hvmpnode={\thestepnum}{#2}{#3}};
}

%% |=====8><-----| %%

\parindent0pt

\begin{document}

\thispagestyle{empty}

\begin{example}{Foobar}[This is a meaningless bunch of bla bla bla to see if this works in any way, shape, or form.]
\step{1 2 3 4 5 6}{bla bla bla lkfjdlkj}
\step[49.66pt]{z b c d e f 7 8 9}{Much more bla bla bla and this is so much more jejune nonsense and a lot more bubbishy stuff that makes no sense. Much more bla bla bla and this is so much more jejune nonsense and a lot more bubbishy stuff that makes no sense.}
\step[49.66pt]{z b c d e f 7 8 9}{Much more bla bla bla, Much more bla bla bla and this is so much more jejune nonsense and a lot more bubbishy stuff that makes no sense. Much more bla bla bla and this is so much more jejune nonsense an}
\step[19.66pt]{z b c d e f 7 8 9}{Much more bla bla bla}
\end{example}

\end{document}
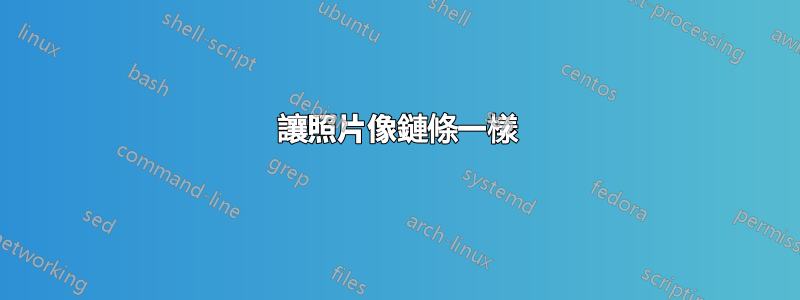
結果(經過幾次編譯以使座標穩定下來):
